Posted on Sep 2nd, 2019
by Olya
Categories:
- Dependencies
All turtles are reptiles (reptiles), which means that they are no worse than crocodiles, snakes and lizards and require the same attention, caution and care. Just like you wouldn't keep a snake and a crocodile on the floor, you shouldn't keep turtles on the floor either. On the floor, a turtle can be stepped on, furniture can be placed on it, it can fall from the balcony, it can eat thread, hair or something similar. In addition, when kept on the floor, the animal cannot dig and does not receive enough heat and ultraviolet radiation, which is necessary for bones and shell.
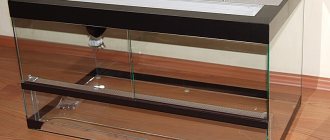
Turtles need their own house - a terrarium or aquaterrarium (for aquatic ones) of a horizontal type (that is, its length must be greater than its height and width). As an alternative to an expensive glass terrarium, you can use a large plastic container. The terrarium should have a “cold corner” where the temperature is maintained at 24–26 °C during the day. It houses the turtle's house, where she sleeps and rests. In the “warm corner” the temperature under the lamp should be 28–32 °C, where the turtle warms itself and eats food. In aquariums, there should be a bank in this place where the aquatic turtle will dry out and warm up.
The temperature in the terrarium is maintained using a heating lamp (incandescent or incandescent mirror lamp). The lamp is installed at a distance of 25–35 cm from the surface (the more powerful the lamp, the higher it is mounted). The power is selected experimentally, usually 40 W is enough, sometimes 60 is needed. If at night the temperature in the apartment drops below 18 ° C, then at this time of day it is worth turning on ceramic or infrared lamps, which give little light and heat well. In order for the animal not to suffer from rickets, it must receive calcium, and an ultraviolet lamp for reptiles, for example Hagen Repty Glo, must be installed in the terrarium. For land turtles, lamps with an emission percentage of UVB 10.0 are used, and for aquatic turtles, lamps with a UVB 5.0 percentage are suitable. You can buy them in pet stores or online pet stores with terrarium products. All lamps are turned on for 10–12 hours during the day; in the summer, an incandescent lamp may not be used.
Land turtles dig a lot in their natural habitat, so there must be soil in the terrarium. It is best to use dust-free wood chips or large pebbles, but sawdust will also work. The main thing is that the turtle does not eat what it walks on. In this case, the soil must be quickly removed and replaced with something else. In aquariums, you can also use soil (rounded large pebbles, cobblestones), but it is not necessary for turtles and often makes cleaning the aquarium and changing the water difficult.
A house for land turtles is made from half a flower pot or from a wooden house for hamsters, which has a widened entrance. Often, two turtles from two houses choose one and prefer to sleep in it. A feeder for land turtles should be wide and heavy enough to prevent the animal from tipping it over. Very often, land turtles like to sleep in their lunch. An aquarium heater and a filter (internal or external), which can easily be found in aquarium departments, help maintain the temperature and cleanliness of an aquarium for aquatic turtles. True, the filter must be selected based on a volume 2-3 times larger than the amount of water in the aquarium, because turtles are larger than fish and there is more dirt from them.
And, of course, to monitor the temperature you need a thermometer. It is best to use a sticker thermometer, which can be attached to the wall of the terrarium or aquarium in the “cold corner”. Thus, your turtle will have everything it needs for a long and healthy existence, and a beautiful terrarium will delight the eye for many years.
The land turtle's need for housing
Among lovers and connoisseurs of amphibian reptiles, there are two different camps regarding the placement and care of a turtle. So, according to some, any animal should have a lot of space to move around within the apartment. According to others, turtles feel great even in forced isolation, being “introverts” by nature. In addition, opponents of “large-scale” walks believe that turtles do not belong on the floor, where the most dirt and dust accumulate. The reptile must have its own – separate – habitat.
Why shouldn't you let your turtle roam freely throughout your apartment? There are several reasons for this.
- Possibility of injury.
- Lack of necessary moisture and light that can be obtained in a terrarium.
- The opportunity to get lost.
- Lack of opportunity to show instincts, as in a normal environment (for example, turtles love to dig).
It is also worth considering that at home, turtles must move on a hard surface, have access to pebbles that can be chewed (reptiles do this), and to shells (this is generally a priority). Walking freely around the apartment, the turtle can spend all its energy searching for non-existent shells. At the same time, she may stumble upon dangerous things - beads, large debris, small objects made of artificial materials. Therefore, a do-it-yourself terrarium for a land turtle should become a natural refuge for the reptile.
Realizing how serious the consequences of the carelessness of the owners are, it’s time to start building a house for the turtle. And it will be a real terrarium.
Types of terrariums for land turtles
Modern varieties of terrariums are presented in a variety of materials from which they are made. Each design option has its own characteristics. Therefore, it is worth considering them separately.
Wooden terrarium
If you go back a few years, many will remember how they kept their favorite turtle in childhood in an unassuming wooden box. This tradition has continued into our time. Only a more advanced design made from natural materials is used as a house. The latter is selected according to size and height. Construction of the structure does not require special skills or effort. You can design a device for living reptiles yourself. For example, it could be some kind of ready-made wooden container or box. All that remains is to transform it into a special enclosure. The design is a regular four-sided rectangular box with non-blind compartments.
Terrarium for a land turtle made of wood with glass elements
For many pet reptile breeders, it is important to keep the pet more supervised. Plexiglas walls help with this. In this case, it is imperative to consider the technical possibilities for free ventilation of the enclosure. For example, the floor in such a design can be made of thin plastic, linoleum can be laid, and a sliding cover can be constructed on top. There can be many variations on the theme of such an enclosure for a turtle.
Plastic container
Although this is not a natural material, it can be used to make a good house for a turtle to live comfortably. You can buy a ready-made design. True, it will be difficult to install a warming lamp in it. The main thing is to provide the turtle with warmth and light, to ensure its safe living (for example, so that the plastic does not overheat when turned on). There are also special plastic cages for rodents on sale that can be adapted for the life of a turtle.
Terrariums for land turtles
New owners of such a pet naturally have a question about how to arrange a terrarium for a land turtle so that it has everything necessary for its long and healthy life. This should be a separate and rather large box made of glass, plastic or plexiglass with all the necessary equipment. You can make it yourself, order it from specialists, or purchase a ready-made version.
Terrarium size for a land turtle
Depending on the number and size of animals, the size of the terrarium for land turtles will vary. So, for one small turtle (6-15 cm in length) a space of 60x50x40 cm is enough. If there are two such babies, then the size of their house increases to 50x50x100 cm. As the number of inhabitants increases or their size increases, the terrarium should grow proportionally. In a simplified way, you can calculate the required size based on 2-6 sizes of the turtle in width and length.
How to set up a terrarium for a turtle?
When we have decided what size and what material the turtle terrarium should be made of, it’s time to start filling it. So, what should a turtle have in its terrarium:
- incandescent lamp or infrared lamp for heating the air;
- UV lamp UVB 5-10% (special for terrariums);
- thermometer to control the air temperature, which should not fall below 25°C;
- soil (pebbles, sawdust, sand and their combination);
- house (a shelter where the turtle can retire);
- place for feeding (saucer or large flat stone);
- swimming place (shallow tank).
Soil for a land turtle in a terrarium
When thinking about how to set up a terrarium for a turtle, we immediately imagine a cozy bedding made from natural materials like pebbles or wood chips. The soil, by the way, performs not only an aesthetic function, it helps to absorb liquid waste products of the animal and helps preserve its limbs without scuffs and deformations when moving along the bottom. The best options for filler in a terrarium for turtles:
- Alder chips. It does not generate dust, does not have a pungent odor, and does not threaten the pet with splinters. The cost of this filler is low and you can buy it at any pet store or supermarket in the “Everything for a Picnic” section.
- Straw or hay. You can store your own grass from the summer and dry it. If desired, the turtle can even have a snack with this filler.
- Pebbles. Smooth and without sharp edges, it must be larger than a turtle's head so that it cannot be swallowed. The stones are useful because they naturally wear down the claws. In addition, during the day it heats up from the lamp and gives off its heat during the night. Pebbles can be collected at the bottom of a pond or bought at a pet store. Before filling into the terrarium, the stones need to be thoroughly calcined in the oven for disinfection.
- Sawdust and sand. Not the best option as they are easy to swallow which is not good for the turtle's health. In addition, both fillers generate a lot of dust, and when wet they can lead to colds. On the other hand, these types of soil are affordable and absorb liquid animal excrement well. Alternatively, sawdust and sand can be used in combination with other types of soil.
Lamp for terrarium with turtle
A home terrarium for turtles should be equipped with two lamps - with a heating lamp and with an ultraviolet lamp. Since the turtle really needs warmth, a heating lamp is a must. This can be a regular incandescent lamp or a special lamp without visible light (infrared). It is placed 30 cm from the bottom of the terrarium. The air under it should warm up to +32°C. This indicator is adjusted by changing the lamp power. You need to hang the heating lamp in the corner opposite from the shelter so that the turtle feels the temperature contrast in these zones.
An ultraviolet lamp is especially necessary for land turtles for better absorption of calcium, which is important for the strength of the shell and limbs. Without such a lamp, the bones become brittle and the shell becomes severely deformed.
Depending on the type (compact or tube lamp T5, T8), they are installed either in a regular base or in the grooves of a special lampshade. If the lamp is mercury, it is connected through a special starter.
Home terrarium for a turtle - decor
As decorations in a terrarium for land turtles, you can use clay shelters (an ordinary flower pot will do), beautiful pebbles, expressive driftwood, photo pictures for the background, real and artificial plants. The most beautiful terrariums for turtles are still glass ones, because through their walls you can clearly see its interior and the reptiles themselves.
DIY wooden terrarium for a land turtle
This is the most common option for arranging a home for a turtle, due to the unpretentious design, quality, reliability and strength of the wooden box. And, most importantly, it will be a more natural habitat for the pet. At the same time, you can calmly think through options for placing lamps for heating the turtle. You can even adapt a lifting and wide shelf, along which it will be convenient for the turtle to climb, like a ladder. And underneath you can arrange a pool for the turtle (she will be very grateful for this).
Simple technology for arranging a wooden enclosure
- A plywood sheet is taken and the base is cut out (about 90×50 m).
- Using glue, planks are applied around the perimeter of the structure, which will serve as the basis for “building” the walls.
- The structure is secured on the sides with screws so as to create a box with a bottom, one back wall and two side walls.
- The bottom is covered with a plywood sheet. This way you can “level” the slats with the floor so that the turtle does not cling and roll over.
- The front wall is made with glass elements. To do this, slats with grooves are attached using glue.
- On the sides you can think about ventilation holes (3 mm in diameter). But this must be done in such a way that drafts do not appear.
- To slightly reduce the risk of midges, insects and dust getting inside the house, a valve is attached to the ventilation holes, which slightly covers it.
- To process wooden elements, the method of double processing with hot drying oil is used. Afterwards, the structure is varnished.
A ready-made house for a land turtle with your own hands can be thought through in terms of design and convenience. For example, you can hang a beautiful lampshade on top. It is also important to ensure that the lamp does not overheat the turtle. A comfortable temperature for her is no more than 26 degrees. The bottom of the enclosure must be laid with pebbles, shells, and pebbles (but not very small ones so that the turtle does not swallow them).
Let's start making it:
- We cut out a base from plywood measuring 90*50 cm. Using a glue gun, we place strips on each side of the base that are necessary to secure the side walls.
- Using the corners for the side walls, we attach the corresponding parts. At this stage we have a “floor”, two side walls and a back one.
- We cover the bottom of the terrarium with another plywood so that the slats do not cause inconvenience to the turtle and the floor is level.
- On the front side of the floor we use a glue gun or special screws to secure a strip with a recess for the glass along which it will move.
- For ventilation, it is advisable to make one hole, because... if 2 or more are done incorrectly, the draft may harm the animal. Under no circumstances should we just leave a hole in the side wall; we cover it with special ventilation plastic that prevents insects and dust from getting inside.
- If you decide to use an incandescent lamp to heat the animal and provide it with light, protect it with a special lampshade and do not place it too low above the surface on which the turtle will move; temperatures above +20...+25 degrees will harm it.
- At the final stage, we decorate the pet’s finished home with pebbles, install a food bowl and drinking bowl, and cover the bottom with bedding.
Place for an aviary
Proper placement of the terrarium will improve the comfort of your “ward” and increase its lifespan. The enclosure is never placed in drafts, in places where there is a flow of people, in dirty places, on the floor, or in direct sunlight. It is important to think through the turtle’s home and territory in such a way that it has a choice - to go for a walk in the enclosure or quietly hide from prying eyes. A DIY land turtle terrarium can last for several years if kept clean.
If you found the article “Terrarium for a land turtle with your own hands” useful, then add the article to bookmarks, share with friends and on social networks
Before you get a pet, you should find out about the conditions under which it will be kept. If you want your pet to remain healthy and always in a good mood, he should be provided with proper care.
If you decide to get a land turtle , you first need to prepare the place where it will live. Please note that she should not be allowed to walk on the floor as she may get injured. The best option for keeping a turtle is an aviary. However, if you don’t have the opportunity to equip it, then a regular terrarium will do.
Terrarium size
You can make a terrarium for a land turtle with your own hands. In this case, you should first determine the size of the future product, which you will then need in order to correctly calculate the amount of materials needed.
When choosing a size, pay attention to the fact that the turtle needs space for a comfortable stay in the terrarium. Therefore, the larger the terrarium, the better.
Before designing a place to live for a reptile, it is recommended to draw a detailed plan on paper. In addition, next to the drawing you must indicate the width, length and height of the product. When choosing a suitable shape for a terrarium, give preference to rectangular or square.
Selection of materials
A mistake many tortoise owners make is choosing a terrarium made entirely of glass. Like humans, reptiles also need peace. In a glass terrarium they will always be visible. Any careless movement, bright light and shadow fluctuations will disturb the turtle's peace. As a result, an impressionable reptile may experience constant stress, which will negatively affect its health.
The best option for a terrarium would be a combination of glass and high-quality plywood. Only the front part of the product should be made of glass. Everything else will consist of opaque plywood. You can use other materials suitable for this purpose.
Preparatory work
Aquaterrariums for red-eared turtles can be made using a variety of materials, namely: polyvinyl chloride, wood, etc. The design can be made on the basis of a frame. In this case, it all depends on the size of the installation. Thus, if it is large, then it is preferable to build a frame, while for small terrariums structures made entirely of plexiglass or glass are excellent.
It is permissible to use, when making aquaterrariums for red-eared turtles, old furniture, the elements of which will be used to make the components of the installation. When making such glass structures, special adhesives should be used. If you have an unknown glue in front of you, then you should definitely read the instructions, this is due to the fact that the composition can be toxic to the animal, which is especially important when installing aquaterrariums.
Where to begin?
First of all, you need to prepare the required amount of materials for making the terrarium. To cut out blanks for your future home, you should also select the appropriate tools. For a glass and plywood terrarium, you will need a regular hacksaw and a glass hacksaw. In addition, you should definitely prepare the glue with which the structural parts will be attached.
To make a terrarium, you may also need additional materials, such as film and soil to cover the bottom of the reptile's housing. You can also use various materials for decoration: large stones, twigs or driftwood.
How to make a terrarium for turtles with your own hands?
Decide on the size of your pet’s home, remember that no animal will feel comfortable being in a small, cramped space. The priority materials for making a terrarium are plexiglass, which now, alas, is not cheap, as well as ordinary plywood. To save money, you can make three walls made of plywood and the front one, through which you will watch your pet, made of plexiglass. Many veterinarians advise doing this for the psychological comfort of the turtle, which your sudden movements and bright light from all sides can cause stress and irritability.
Stages of creating a terrarium with your own hands
It is quite possible to make a terrarium for a land turtle with your own hands without having any special knowledge. To make a home for a reptile, use the following instructions:
- We prepare all the blanks necessary for the future product, which must have smooth and neat edges.
- We fix the bottom of the future terrarium on the working surface.
- Attach the side walls using universal glue.
- We attach the back wall with glue. Be sure to check the reliability of the fastening.
- Additionally, we strengthen the structure using special corners with screws. After this, we cover the corners with special decor so that the reptile does not get injured on them.
- After all the parts of the terrarium have been assembled, we move on to attaching the front glass wall. We attach it to the plywood using the same universal glue.
- After finishing the work, we check the product for cracks. If they are found, we treat them with liquid nails or sealant. Pay attention to this stage, since if there are cracks, the turtle’s waste products may leak out. In addition, the presence of cracks can contribute to the appearance of a draft inside the terrarium, which will negatively affect the health of your pet.
DIY bridges for turtles
Many people have probably seen bridges for turtles in stores. These are environmentally friendly and safe products that are usually held on the walls of the aquarium using suction cups.
You can make such bridges for turtles with your own hands. The main condition for this is not to use untreated tree branches or driftwood. The fact is that pet stores sell bridges treated with a special impregnation that prevents wood from rotting. If you put an ordinary branch into an aquarium, the water in it will soon deteriorate and can even harm the health of the turtle, just like improper feeding of turtles.
Lid
A similar detail may be needed if you have other animals living in your house that could harm the turtle. In this case, the lid on the terrarium will protect your pet from danger.
The lid can be made from absolutely any materials. However, when choosing a suitable option, pay attention to the fact that under the cover there will be an electric lamp designed to illuminate the terrarium. Therefore, it is better for you to give preference to fire-resistant materials, such as glass or some kind of metal. When attaching the lamp, make sure that it does not touch the walls and lid of the terrarium structure.
Chapter 4. DIY turtle terrarium
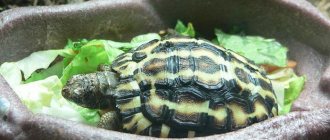
Olga (kleo). Ivano-Frankivsk, Ukraine Pets: Central Asian tortoises Helga and Zlata
My name is Olya, I am from Ivano-Frankivsk, which is in Ukraine, my nickname on the forum is kleo. I have two turtles Helga and Zlata. At first there was only Helga, a Central Asian turtle, and she lived in an aquarium converted into a terrarium (photo 1). I saw enough of terrariums on the forum and decided to make my own.
First, I started a topic on the forum and selected materials. Glass is expensive, I thought maybe OSB? But they assured me that it was unsafe and could emit toxic fumes, and they recommended plywood. The advantages of plywood: environmental friendliness and low cost (when compared, for example, with glass). We paid 190 UAH for a sheet of plywood, which is about 23.5 dollars. They also paid about 40 UAH to cut it. (5 dollars). Cons: uneven surface and (well, it also depends on those who cut) they cut crookedly, I don’t know how glass is cut, but I think it’s better and the surface is definitely smoother. In the future, you can't stick it in the bathtub and wash it (like I did with my glass terr) and the unsightly appearance of the plywood itself. And one more nuance: plywood is suitable only for those turtles who, due to their housing conditions, do not need high humidity. If necessary, glass would be best, of course. I’ll say about the size of the terra: the bigger, the better. If space allows and you can roam around, then do more, because many are not limited to one turtle. My terrarium is 87*47*48 cm (length, width, height). At first I made it for one turtle and didn’t plan a second one, but now two live there. So, we bought these sheets of plywood (photo 2), liquid nails “Montazh” (photo 3), we chose the glue to be as environmentally friendly as possible, this one is water-based.
Tools: a special glue gun (photo 4), a small drill (photo 5), and a screwdriver.
We first glued it onto the board, this will be the bottom (photo 6), and then nailed a plank on both sides for support (photo 7). Then we glued the side wall (photo 8). In order to secure it tightly, we also screwed in a corner (photo 9).
We provide ventilation on the sides. We cut two holes, I did not make them opposite, but one slightly higher, the second lower, but approximately in the middle, so that there is no draft. Then they covered the plywood with self-adhesive film imitating wood patterns. You could leave it like that, but it doesn’t look very good. And they installed ventilation. This is what it looks like (photo 17).
Instead of the background, we decided to decorate the inside with something else. My husband said it would be beautiful if you took the bark of a tree. The bark must be dried in the oven before use. They glued it directly onto the plywood, using the same water glue as everyone else, and put bottles of water on top (or something heavy) so that everything would stick (photo 18).
We bought a flower pot for the incandescent lamp so that it would protect the plywood from overheating, and screwed (photo 19) a lamp for the UV lamp under the lid. Both the incandescent lamp and the UV lamp are controlled by such simple switches (photo 20). This is done in order to turn off the incandescent lamp in the heat.
Then they made the floor. We bought thick oilcloth and glued it to the plywood (photo 21).
This is how we created our own terrarium (photo 22).
A year later, I can say that the bark is just starting to fall off, maybe it was necessary to secure it better, or put a background, everything else is in good condition.
I didn’t dwell in detail on the soil, lamps and other nuances, this is in other sections, I just wanted to show that making a terrarium yourself is not difficult and very expensive, you don’t even have to buy plywood, but take pieces of old furniture, the main thing is - the desire for your turtle to live in normal conditions.
Ventilation
Ventilation should be provided in the terrarium, which will facilitate the flow of oxygen, sufficient air exchange and eliminate unpleasant odors arising from the turtle’s waste products. To do this, make one ventilation hole in the reptile's home. It is not recommended to do them anymore, as this may cause drafts to appear in the terrarium.
The ventilation hole should be made at the stage of creating blanks for the terrarium. Having made a hole, be sure to decorate it with a ventilation partition.
Decor
Once you have completely assembled the structure of the dwelling for the land turtle, you can move on to the final stage - designing the terrarium. It is advisable to cover the bottom with a special primer. In addition, it is necessary to provide lighting, install a bowl for feeding the pet and decorate the terrarium with decor.
As can be seen from the above, creating a terrarium with your own hands is a fairly simple and quick undertaking. The main thing in the manufacturing process is a responsible approach and careful attention to detail.
How to make a terrarium with your own hands?
First of all, let's look at how to make an artificial terrarium with your own hands for land turtles. Land turtles are the most popular due to their ease of maintenance and unpretentiousness in food. They are also the cheapest among all turtle species. This contributes to the fact that they are most often chosen as exotic pets. First of all, you need to remember the basic rules for keeping such turtles:
- They are very sensitive to sudden temperature changes and drafts, so do not let your pet move independently on the floor of the apartment.
- To strengthen a turtle’s immunity, its diet must contain all the necessary vitamins and microelements, as well as calcium in the required amount, since if it is deficient, the animal will begin to have problems with the strength of its shell, and cracks and chips may appear.
- The bottom of the terrarium should be covered with soft material up to 5 cm thick, ensuring easy movement and zero risk of injury. The best options are sawdust and hay. If you notice that a turtle is eating hay bedding, do not be alarmed; this does not pose any danger to its health. The disadvantage of sawdust bedding is that it quickly deteriorates and needs to be replaced.