In what cases is it used?
Such a protective device is indispensable in cases where it is necessary to limit access of the head to the body or paws to the head:
- Postoperative period. Most often, a collar for a cat is prescribed after castration or sterilization. There are also surgical operations. The collar serves as a means of protecting the seams from licking and infection.
- Application of medications. In such cases, it is necessary to apply the product and wait until it is completely absorbed. This could be an ointment after surgery or an antifungal agent when treating lichen.
- Preventive chemical treatment. Periodically, every animal needs treatment for parasites. This way, you will protect the animal from licking its fur and getting toxic substances into the body.
- Disease on the head. A common skin disease in cats is ear mites. It is accompanied by a constant desire to scratch the ears and, as a result, scratched wounds. It needs to be treated in a timely manner and, most importantly, to limit access to the auricle.
Such a protective collar can be purchased in a store or made independently from available materials.
When does a high collar become necessary?
- The doctor advises putting a hard and high collar on the pet’s neck after castration, sterilization and other operations . These animals have an innate habit of licking their private parts after using the toilet. If a cat touches a fresh wound with such a muzzle, it may become infected.
- scratch wounds with their claws or teeth , which is also dangerous . You should not allow your pet to lick its fur and skin after it has been treated with chemicals . Such toxic and hazardous substances include various flea sprays, tick ointments, antibacterial drugs, and hormonal creams.
- When lichen is treated with antifungal agents, which are applied to the inflamed areas of the skin. If the product enters the esophagus, it can cause poisoning, and a high collar will prevent such entry.
- The device also saves in the case of applying a bandage to an animal's wound . The cat will try to remove the bandage or gauze bandage, thereby damaging the wound.
Choosing a product in the store
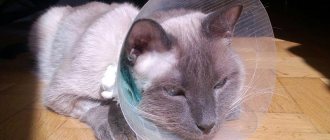
The veterinary collar is transparent plastic. The advantage is that the animal’s view is not blocked and it does not interfere with its orientation in space. The sides are connected to each other and form a cone shape, which allows you to move and eat food as usual. The holes at the bottom allow you to secure the product with a collar or a simple bandage.
There is a certain numbering: No. 7 (7.5 cm), No. 10 (10.5 cm), No. 12 (12 cm), No. 15 (15 cm), No. 20 (21.5 cm), No. 25 (25 cm ). The number or size refers to the width of the protective field.
The protective collar should hold well, but not be tight. It is enough for one finger to pass between the neck and collar.
For kittens use No. 7, No. 10 is suitable for a medium-sized cat and No. 12 for a large cat.
It will not be difficult to find and buy such a product, especially since it is inexpensive. The main problem will be finding the right size. In this case, you can make a protective collar for your cat with your own hands using what you have at home.
Design requirements
A high-quality design must meet the following requirements:
- It should not put pressure on the animal's throat. Difficulty breathing is fraught with hypoxia;
- The design should not be too heavy, otherwise the animal will have problems with posture and back;
- A cap that is too loose will not last even a few minutes on your pet - she will take it off in one motion;
- The accessory must match the size of the cat. A small kitten will feel uncomfortable if you put an “adult” cap on it.
An incorrectly sized collar can cause discomfort for your cat.
That's all you need to know about cat collars. If your pet needs such “protection”, you can buy a ready-made collar or make it yourself.
If you have questions regarding the topic, please ask us.
How to make a cat collar mockup
To make a layout, we need to know two things:
- the length of the inner (smaller) circumference is the circumference of the neck. To do this, you can put on a collar and measure its length. Be sure to adjust the strap.
- the width of the product itself. Measure the length of the neck from the collar to the tip of the nose and add 5 cm.
It is better to use a harness to secure the collar: this reduces the load from the neck and distributes it over the body.
Making a protective product for a pet
You can make a collar for your pet yourself. There are several different ways to make it, depending on the materials chosen.
Express version made from cardboard
If you don’t have time to purchase a collar, but you need it urgently, you can build it in a short time from what you have at hand. You will need:
- thick cardboard;
- tape measure;
- compass;
- stapler;
- scissors;
- scotch.
The procedure is as follows:
- On a sheet of cardboard we draw a semicircle (diameter - 20–25 centimeters).
- Cut out the part and roll it into a funnel.
- Using a measuring tape, we find out the circumference of the pet’s neck.
- At the base of the cone we make a hole, the diameter of which is equal to the circumference of the cat’s neck.
- After you wrap the future collar around the cat’s neck, its side sections will need to be secured with a stapler or tape.
Video: making an “Elizabethan” collar with your own hands from cardboard
Collar made of plastic
To make a plastic collar you will need:
- two-liter plastic bottle or stationery folder;
- Velcro;
- stapler;
- scissors;
- adhesive plaster.
A plastic collar is not the most comfortable option available. But if the animal does not have too long a rehabilitation period, then it is quite suitable, especially since this product can be made more comfortable.
Do not give in to provocation - any animal will try to remove the collar
It is made as follows:
- Cut a two-liter bottle in half (or unfold a plastic folder), draw and cut out a collar in the form of a semicircle (it is also better to limit its diameter to 25 centimeters).
- Fold the semicircle into a cone. At its base, cut a hole with a diameter determined by the thickness of the cat’s neck.
- Attach Velcro fasteners to the side sections of the cone with a stapler. You can also make holes at the edges of the cuts using sharp scissors and connect them with a soft cord or ribbon.
- Cover the top and bottom edges of the collar with adhesive tape. This will soften the edge adjacent to the cat's neck and strengthen the one that will encounter obstacles. It is very important that all edges of the homemade plastic collar are even and smooth.
Video: making your own plastic collar
Fabric collar
Despite its apparent complexity, making a fabric collar will be no more difficult than the first two. This is the most comfortable and soft protective product for a cat.
You will need:
- paper;
- ruler;
- compass;
- scissors;
- threads;
- needle;
- natural fabric;
- felt or thick non-woven fabric;
- Velcro.
The shape of the collar is again a semicircle with a diameter of 25 centimeters. The collar pattern is first drawn on paper.
Then proceed like this:
- Using the resulting layout, apply the pattern to the fabric (it is better to use cotton or linen) and cut out two identical parts.
- They try the pattern on the cat and cut off the excess. By the way, it is always better to cut a piece of a larger size and reduce it if necessary, than to save fabric and find that the product is too small.
- Using the same pattern, you need to cut out parts from felt or non-woven fabric. You can use several layers of other, less dense fabrics (for example, drape) and stitch with small diamond patterns.
- Now a layer of strong material is sewn inside two pieces of thin fabric. To do this, the three resulting layers are stitched along the entire perimeter, excluding a small section 5 centimeters long. It is necessary so that you can later turn the collar right side out through it.
- Turn the product inside out and iron it.
- The remaining hole is sewn up by machine or by hand.
- Ties or Velcro are sewn onto the side edges to secure the device to the cat’s neck.
Fabric collar - soft and comfortable barrier
It is important to remember the disadvantage of a fabric collar - it retains its shape worse than other models. An active cat that tries to get rid of it will quickly deform the protective accessory. To avoid this, you can make the collar fields not too wide - let them cover only the cheeks. And along the outer perimeter of the collar you can put a thick edging - it will also help the product keep its shape.
Collar made from disposable tableware
An original solution would be to make a collar from cardboard disposable tableware. Some owners manage to fit the cat's head into the hole cut out in the middle, but it would be much better to cut the plate in one place towards the inner circle. This slot will allow you to put the collar on without disturbing your cat. It can be secured with tape or a stapler.
Cardboard disposable tableware can be used as a protective collar
Collar made on the basis of a purchased one
We have already said that a purchased plastic collar can hardly be called comfortable. Soft collars are not cheap (about a thousand rubles). If you want to save money and at the same time please your little animal, you can buy a plastic collar at a veterinary hospital and turn it into a comfortable product. Just cut off unnecessary straps from a purchased collar and use it as the basis for cutting out fabric parts. You can simply sew the fabric to a plastic base, making punctures along its perimeter with sharp scissors. The second option is to do the same as when sewing a fabric collar. Just use a store-bought collar instead of thick fabric. This will give the soft device extra rigidity.
Quick collar made of soft plastic or cardboard
Perhaps the simplest and fastest option for making a protective collar. Suitable materials are soft plastic or polyethylene, for example, a paper folder. It's better if it's transparent. You can use medium-hard cardboard.
- make a model (preferably with a reserve) on paper and try it on an animal
- transfer the pattern to the main material and cut it out
- try it on again on the pet, remove excess and trim
- We fasten the edges of the product with materials of your choice: lacing, double-sided tape, Velcro used in sewing, buttons
- tape the edges
This option is suitable for the first time. For example: it is not possible to purchase a collar in a store, but measures must be taken immediately. A good disposable option when treating your pet for parasites.
In case of long-term use, you need to acquire or manufacture a more reliable and convenient design.
What to do if the animal cannot get used to the collar
A cat owner may notice that his pet is taking off his protective collar, what should he do in this case? Most likely, an unreliable design was chosen that can be easily removed over the head or unfastened or torn.
Perhaps the product has sharp edges that rub the animal’s neck and cause irritation . This assumption should be tested.
IMPORTANT! Cats have a great sense of how people treat them. If, in addition to the inconvenient design, they also receive indifference from the owners, rehabilitation after injury or surgery will be difficult.
There are cats that will not be able to put up with a collar for a long time; you need to show maximum attention to your pet, pick it up more often, and calm it down. When it’s time for lunch, the “Spanish cow collar,” as it is sometimes called, needs to be removed and the cat should be fed something tasty.
Your cat may be irritated by certain types of collars, such as those made of plastic or opaque. If you change the design, the cat calms down and over time gets used to slight discomfort.
Plastic bottle collar
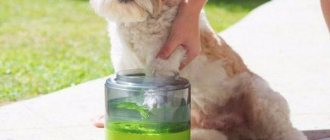
The option of using a plastic bottle is more suitable for dogs. Such plastic is rough and can rub the cat’s neck and even injure it.
The main thing here is to choose the container of the required size. For a medium-sized cat, you can use a 2 liter bottle. Pots for flowers or seedlings are also used.
- on the side of the neck, mark the diameter equal to the circumference of the pet’s neck
- measure the length of the product (neck length to nose plus 5 cm)
- cut off unnecessary parts
- cut the bottle lengthwise and make holes for lacing on both sides (you can use a heated screwdriver or nail)
- we process the edges of the bottle: an adhesive plaster on a rag basis or fabric is suitable as a finishing
- attach loops or glue the product to the collar
The protective collar is ready for use. You can use other suitable items: soft plastic plates of different sizes and food-grade foam dishes.
How to put on a cone correctly?
The procedure is best carried out by two people: one person should hold the animal, and the second should put on its collar. The main thing is to do everything carefully and not to rush, so that the cat’s stitches do not come apart (for example, after castration). To put a protective collar on a cat, you need to:
- assemble the product following the instructions and attach it to the collar or bandage;
- place the pet on a flat surface and secure it with your hands;
- put on a collar with a collar and check whether it is too tight for the cat, then fasten all the elements of the structure;
- calm your pet down - give him his favorite treat, pet him and pick him up.
You need to keep an eye on the animal, as it can get stuck in narrow passages or cling to other objects. To avoid dermatosis, it is necessary to regularly check the skin of your pet’s neck for abrasions - this can happen if you use a rough collar, a heavy structure, or fix it with the same non-sterile bandage every day. Due to the fact that it is difficult for a cat to lick itself because of the collar, it is necessary to comb its fur more often.
Fabric collar
A protective collar made of fabric will certainly be more comfortable and soft. This is especially true during sleep periods. However, this should not become a reason for the animal to be able to remove it or crush it and reach the seams.
To do this, choose dense and strong fabric (cotton, linen). Make two mock-ups and place soft cardboard or fabric folded several times inside. The edging should be made of dense material.
This way the shape will hold better. You can sew Velcro onto the edges. This collar can be taken off and put on at any time. If long hair does not allow this, use lacing.
We sew loops along the bottom of the product and thread the fastening through them. Now the animal will not be able to remove the collar so easily.
Features of the protective structure
The size range of E-collars is very extensive.
The dog collar is used as a restrictive therapeutic element. It allows you to train your dog not to violate the conditions of postoperative care. Very often, veterinarians strongly recommend the use of such a design to increase the efficiency of healing or in case of detection of dermatological diseases that cause itching.
Many dog lovers do not know what a dog cone is called. The scientific name is a protective collar, which can be made from a wide variety of materials. The right collar will not only protect the dog from all kinds of damage, but will also not be a burden for the pet. The dog will be able to eat food freely, the main thing is to approach the addiction process responsibly. This must be done consistently and carefully.
Note! What kind of collar a dog needs depends on the specific case. In this matter, it is necessary to obtain the advice of a veterinarian and strictly follow it.
Neither owners nor pets like to be separated from each other for a long time. Sometimes dogs are allowed to go home earlier than the required post-operative period. It is in these cases that veterinarians strongly recommend using, in fact, a very simple device to protect the pet from itself - a special collar.
Wearing rules
The main purpose of such a pet collar is protection. You can watch how the animal tries to take it off and how uncomfortable it is for him to be in it. Don't be led by emotions. Over time, he will get used to the new “accessory”.
After putting on and securing the product, make sure that the animal feels comfortable, namely: the product is not secured tightly and the edges do not rub the neck.
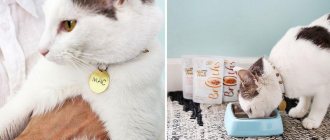
There are times when a cat wearing a collar refuses to eat. You can try placing the bowl on a hill so that the edges of the product do not touch the floor. Otherwise, you will have to take off the protection during feeding and put it back on. Be vigilant at this time so that your pet does not get into trouble.
Remember that such an adaptation, like the situation itself, is stressful for the animal. They sense your mood well, so take your pet in your arms more often and show care. Sometimes you can remove the protective product and let the cat rest under your careful supervision.
What it is
The Elizabethan collar is a device that performs a protective function. Oddly enough, the E-collar protects the cat from itself, that is, it prevents licking when this should not be done.
It was invented for pets during the time of Elizabeth, which is where the name comes from. Then the device was used for aesthetic purposes: the accessory prevented the royal cat from scratching in public, thereby tarnishing the image of its noble owner.
Today, after carrying out various medical manipulations with an animal, veterinarians advise using this device.
In appearance, the accessory resembles a hat with the brim pointing upward and worn around the animal’s neck.
On the one hand, it may seem that the cat will not be able to withstand such hooliganism and come to terms with such a wardrobe detail. However, if you choose the device correctly, it will take a minimum of time to get used to it. It is also important to correctly put an unusual design on a cat. If you scare your dog while getting dressed, you are unlikely to get used to it quickly. As in any business related to cats, cunning and cunning are required.