Choosing corals for a marine aquarium and their mounting
Along with fish, corals will also thrive in a marine aquarium. There are a huge number of them, so in the aquarium hobby they are grouped according to the following criteria:
- presence or absence of a hard calcium carbonate skeleton
- size of polyps
Based on these characteristics, corals are classified into:
- soft: Amplexidiscus, Briarium, Cladiella, Clavularia, Dendronephthia, Discosomes, Rodactis, Ricordia, Sarcaphyton, Scleronephthia, Sinularia, Xenia, Zoanathus and others. For beginners, it is better to choose corals from this group, since caring for them is not particularly difficult.
- solid with large polyps - LPS: Acantastroea, blastamus, catalaphyla, caulastraea, cycloseris, duncanopsamia, euphyllia, favia, goniopora, lobophilia, oxypora, platigyra, plerogyra, scolimia, trachyphyllia, turbinaria and others.
- solid with small polyps - SPS: Acropora, montipora, pocylopora, seriatopora and others. Corals from this group are more demanding in terms of the conditions of their maintenance and care.
— anemones: sea anemones. Their tentacles are one large polyp and resemble a case full of water.
We have looked at the types of corals, but which one should you choose?
As mentioned above, first buy soft corals. Once you have mastered the basics of handling these organisms, you can purchase LPS and SPS. These groups are more demanding in terms of living conditions and require more care. When you go to the store, make a purchase based on your means, because now you need corals for acquaintance; there is no point in buying some unusual ones that are more difficult to handle and breed, because you are unlikely to cope with them without proper experience. And after some time it will become clear to you who else you would like to see in your mini-reservoir. It is important not to fill the aquarium with corals at the first stage, because they and other inhabitants grow, otherwise there will be no room left for their growth. Also, many coral species behave aggressively towards their neighbors in order to get a better place to live.
Basically, corals are sold attached to a stone called a “plug”. After the purchase, you will need to determine the most favorable place in your pond for the life and development of this organism; you will be required to closely observe whether it has enough light and whether it has begun to wither.
When the coral dissolves its polyps, you can be happy, because this means that everything is fine and think about how to secure it. Two-component epoxylin is best suited for this purpose. You need to cut off equal parts from each glue sausage and mix them together. Next, we wait 3-4 minutes so that the glue is fixed and does not collect dust under water, after which we fasten the surfaces we need under water. Everyone knows that the gel will also cope with the task. It happens that coral is sold without a plug, in which case needles, elastic bands or tourniquets will come into play. In about 10 days, the coral will grow to the stone, then the auxiliary material can be removed.
How to Set Up and Run a Marine Aquarium
Every saltwater aquarium requires certain conditions to be met.
Choosing a location for installing the tank
A saltwater aquarium should be located in a location that is protected from direct sunlight. It is important that there are sockets nearby to connect equipment for water purification and tank lighting. At the same time, a safe distance to other devices is maintained. You should not choose a place near sources of loud noise.
Recommended types of flooring are tiles and linoleum. This is explained by the fact that water can be easily and quickly removed from them.
The stand for the aquarium must be durable and proportionate to the dimensions. If it is wooden, it is necessary to use materials that protect against the ingress of liquid and subsequent swelling. The ideal choice is a special cabinet, since, in addition to being compact, it will allow you to install a tank with a set of equipment. The space nearby can be decorated with indoor plants, creating a semblance of a garden. For example, crocus, araucaria or calla lily.
Filling with water
The liquid that will serve as the basis for a marine aquarium must undergo a reverse osmosis procedure in stages in advance. Filters will remove salts, chlorine and other substances from water that negatively affect the condition of organisms.
After the tank is 2/3 full, you need to check the condition of the seams - if there is moisture on them, then the launch will have to be postponed. In the absence of a problem, salinity gradually increases. For this purpose, only special aquarium salt can be used at the rate of 35 g per 1 liter. It is recommended to first dissolve it in warm water, which will avoid settling in one place.
The density of the liquid in the aquarium is checked with an aerometer. Optimal - from 1.023 to 1.025. The salt content is determined using a refractometer. Temperature setting – set to +25 ºC.
Adding Soil and Live Rocks
In order to form the first bottom layer, you can use soil and place live stones on it (artificial or natural - it doesn’t matter). Their benefit, in addition to the function of shelter for the inhabitants, is explained by the presence of microorganisms that correct the state of the water and bring closer the release of fish and corals.
Before putting this stage into practice, you need to choose the type of aquarium:
- Sea body of water. The soil is laid at an angle. This will allow you to easily remove all waste left by fish, planaria and other small pests.
- Vertical reef. Decorations (bioceramics and other materials) together with the soil are laid evenly on the bottom over the entire surface. The more space you can clean with a siphon, the better.
Next, turn on the pumps and filters according to the instructions. Wait until the environment normalizes and the water is similar to real sea water in terms of the content of magnesium, calcium and other elements. If the aquarium volume is less than 100 liters, 21 days is enough. With a large capacity you need to wait a month.
Creating a coral reef
After checking the salt water levels and the proper operation of the equipment, you can begin planting corals around the perimeter of the aquarium. The choice should be made after familiarizing yourself with all the possible decoration options, having learned the advantages and disadvantages of design styles.
Launching shrimp and fish
First, the owner must decide what types of fish will live in the aquarium and determine the number of individuals:
- if the choice is made in favor of several small ones, a budget tank of 100 liters (0.1 cubic meters) will suffice;
- if you want to accommodate large fish, you will need a tank of 200 liters (0.2 cubic meters) or more.
During the launch process, the first species to appear should be those that are not characterized by demanding conditions. It is recommended to turn off the outdoor lights, which will allow them to quickly adapt to the new environment. Individuals accustomed to establishing and defending their territory should appear last to avoid conflicts. Arthropods should be introduced approximately 7 days before fish.
Installation of lighting system
Circuits from LED or fluorescent, metal halide sources are suitable. The calculation of the power and number of lamps is carried out based on the capacity of the aquarium, the inhabitants with different lighting requirements.
Selecting Invertebrates for a Saltwater Aquarium
- Snails
- Lithopoma (Astraea) spp.
- Trochus
- Turbo
- Lysmata amboinensis
- Lysmata debelius
- Stenopus hispidus
- Lysmata wurdemanni
- Dardanus spp.
- Calcinus spp.
- Diadema antillarum
- Diadema setosum
- Echinometra lividus
- Tripneustes gratilla
- Family Sabellidae
- Family Serpulidae
- Class Ophiuridea (brittle stars)
- Sea stars:
- Blue starfish Linckia laevigata
- Red starfish Fromia elegans
- Orange Fromia monilis
- Bivalves
- Tridacna crocea
- Tradacna maxima
Invertebrates must be present in a marine aquarium. When choosing, be sure to study what size they will grow to. So, sea urchins are only suitable for aquariums of sufficient size. And, if you have large shells lying at the bottom, then hermit crabs will occupy them, and at the same time, there will be free space in the aquarium that is not intended for crayfish. Remember this and leave small shells.
Have you decided to organize a marine aquarium and are wondering how and where to start?
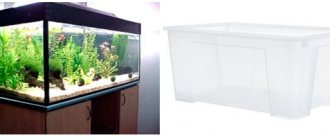
Let's figure it out together. To begin with, of course, you will need the aquarium itself. There are three possible options here.
From freshwater to marine
Perhaps you have already been involved in aquarium farming and have a former freshwater aquarium. Not bad already. A simple marine aquarium can also be organized from a freshwater tank. There are a great many examples of such marine aquariums. Of course, it will have to be modernized and rebuilt for a maritime system. What will you have to change and buy in addition? The first and most important thing is to redo the lighting. If T8 or, more likely, T5 lamps were used in the lid of such an aquarium, they will need to be replaced with spectrum lamps suitable for marine life. The required color temperature is 10000-14000 Kelvin. Conventionally, 10,000 is cold white, followed by 14,000 blue. The standard lid of an average aquarium complex has a not very large volume of 100 - 200 liters. There are four places for installing lamps. Accordingly, we install two cold white light lamps and two blue lamps intended for MA. This set is quite enough for the well-being of not very fastidious soft corals and, of course, fish, shrimp, crustaceans for which light is, by and large, not important.
Freshwater aquarium complex
The advantages of the option when a fresh one is converted into a saltwater aquarium. It is clear that its presence. There is no need to buy an aquarium. The ability to convert freshwater lighting to marine lighting by simply replacing the lamps. Disadvantages: to install a sump (we’ll talk about what a samp is and why it’s needed below) you’ll have to organize an overflow (a system of pipes and hoses connecting the aquarium and the technical container underneath). That is, drill the side glass or bottom of the aquarium. It is possible to install an overflow without holes in the aquarium itself, the so-called hinged overflow. But in terms of convenience and reliability, it loses to the first option.
Is it possible to make a saltwater aquarium without a sump? Yes, it is quite possible and this option has the right to life. But it’s more convenient with a samp. Why? You will understand after reading the article to the end. Next point. A freshwater aquarium usually has stiffening ribs and ties, sometimes this makes it very difficult to maintain the aquarium. Plus, the appearance suffers to some extent. They try to make marine aquariums open, although this is not for everyone. The appearance issue is offset by the presence of a lid, although its use in a marine aquarium also has a number of negative aspects. Generally speaking. Converting a fresh aquarium into a marine one is a very common option. However, most likely you will come to that sooner or later. That gaining experience. You will create a marine system that meets your requirements and does not have the disadvantages of a fresh aquarium.
Choosing equipment for a marine aquarium
Nowadays there are a huge number of manufacturers of aquarium equipment on the market, and, consequently, the products themselves. Therefore, you can safely rely on your taste and wallet. The lowest priced aquariums are from China. Let's look at what components you need to go to the store for:
- return pump
When choosing, the main characteristic will be the volume of water supply needed specifically for our aquarium. 5-10 volumes of circulation per hour between the aquarium and SAMP. A 2500 l/h pump is quite suitable for a 250 liter aquarium, but 3000 l/h is better. Here you need to understand that the power of the water supply flow will be lower when it passes through the pipes, and the flow also depends on the height of the water supply (manufacturers indicate this dependence on products). It is better to get a pump with a higher capacity to overcome these reductions in water flow, and with a flow control feature. Also pay attention to the noise of the pump; this characteristic can be found by studying reviews from other customers.
- circulation pumps
For this product we need to study 2 main parameters: the volume of circulation and the method of attachment to the wall of the aquarium. It’s better not to use suction cups, as they don’t hold very tightly, and when they come off, they scare residents and cause unnecessary manipulations that we don’t need. We recommend taking pumps with magnetic mounts. You can also find pumps with controllers, but it’s better not to buy them for now. The circulation volume we need in the main display is in the range of 10-50 aquarium volumes per hour. Here I recommend: for 250 liters, two pumps of 3000 l/hour, it is also possible to install pumps with different indicators, for example, one for 3000 l/hour, and the second for 5000 l/hour. Also know that it is better to take two low-power pumps than one powerful one.
- skimmer
The packaging of this device always indicates what volume of water it is suitable for, but we advise you to take 30% more than yours for volumes. When purchasing, pay attention to ease of maintenance, ease of setup, stability, noise and other parameters. Therefore, it is better to first study reviews or chat about purchasing on an aquarium forum. Also, you can save on your purchase by purchasing only the skimmer pump and making the body yourself.
- heating pad with thermostat
Here we will give the same advice as when buying a pump: buy two devices of low power, and not one particularly powerful one.
- thermometer
We don’t have any wishes here, take any one that suits you and your wallet the most.
-refractometer for measuring water salinity or hydrometer or hygrometer
Experienced aquarists prefer to use a refractometer. But for starters, a hydrometer or hygrometer will suit you; their price is an order of magnitude lower. They are necessary to monitor and regulate the salinity of the water in our body of water.
There is still a huge number of equipment, but our list will be just right for starting your activity as an aquarist.
Let's start the launch
The most important and difficult point in equipping a marine aquarium, because the water in it must be perfectly clean and contain a minimum amount of nitrates. If in natural conditions nature itself takes care of this, and sea currents constantly bring fresh and clean water, then in an aquarium the problem of water purity can only be dealt with with the help of special equipment.
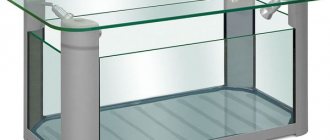
A sump is a container made of organic glass, divided by partitions into compartments in which various aquarium equipment is installed. The sump is usually equipped in an aquarium cabinet, but has direct communication with the aquarium. It can be purchased (there is now a large selection of sumps on sale with all the necessary equipment) or made independently, in this case the aquarist has the opportunity to uniquely select the aquarium equipment that is most suitable for him.
What should be in the sump?
- Foam separating column (skimmer). With the help of this device, organic matter that is constantly present there is removed from water, even before its decomposition begins. Even dirt invisible to the naked eye quickly collects on the bubbles that the skimmer creates and accumulates in a special compartment, from where it is then easily removed.
- Biological filter. For these purposes, a separate compartment of the sump is usually filled with filter material. This can be coral chips, as well as special bio-balls or other porous organic material. The larger the surface of the biological filter, the more bacteria there are, and accordingly the quality of biological filtration improves. We must not forget about the amount of oxygen required for the process, as well as the speed of water flow through the filter. Together, these three factors create the biological stability of the entire system.
- Algae (refugium). Algae can very effectively remove nitrates from water; in addition, microplankton multiply in algae, which serves as food for many inhabitants of a marine aquarium. To organize algae growth, lighting is installed above one of the compartments of the sump with running water, and the lamp must be powerful enough (70-100 W). Algae (chaetamorph) are placed at the bottom of the compartment, which grow and reproduce very well in conditions of high nitrate content and bright lighting. Their number must be kept under control, because When the algae grows excessively, they absorb too many trace elements from the water, and this is harmful to the corals. The water flow in the algae bed should be slower than in the entire aquarium.
- Return pump. It is usually installed in a special sump compartment with a variable water level. In this case, the compartment is made large enough to accommodate the entire volume of water that will drain from the aquarium in the event of an emergency power outage or pump breakdown. To reduce the amount of draining water when a similar situation occurs, holes are made near the end of the return tube lowered into the aquarium at a distance of 1.5 cm below the water level. When the level drops, air enters the holes and the drainage stops. You also need to pay attention to the power of the return pump. The optimal solution would be a pump that can pump about 10 volumes of the aquarium per hour. In this case, decomposition products will be removed from the aquarium in a timely manner, and the water will be sufficiently saturated with oxygen.
- Auto top-up. A system for replacing water evaporated from the aquarium, which makes life much easier for its owner, because... Monitoring the level every day is quite tedious. The pump (specialized stores currently offer a large selection of them) is installed in a separate compartment of the sump according to the instructions.
- Additional compartments. It is recommended to purchase or make your own sump, providing for spare compartments. Methods for purifying water in a marine aquarium are constantly being improved and it is possible that additional compartments will be required to install any innovation. In addition, a water heater can be installed in the sump, which in this case does not spoil the appearance of the “sea” landscape created by the aquarist.
We suggest you read: What to feed a Chihuahua puppy at 3, 4, 5, 6 months?
Choosing lighting for a marine aquarium
If you decide to use an outdoor aquarium, be sure to plan how you will mount the lights before going to the store to buy lamps. When you come to the store, choose fluorescent lamps (LL), metallogen lamps (MG) or diode lighting; they are most suitable in our case.
When purchasing, rely only on your taste and income, because all these options will suit you and it will not be possible to single out one of them. Placing lamps close to the surface of the water is unacceptable, as it will heat it up. Also in summer there will be a question about cooling sea water. Lamp manufacturers advise changing them every six months or a year, but in practice it has been observed that such frequent replacement is not necessary, they work without breakdowns for up to 2 years or more. Diode lighting outperforms lamp lighting in terms of energy consumption, but also in price, but only to a greater extent.
How to choose soil for a marine aquarium
Now that the aquarium and equipment have already been purchased, we are starting to fill the aquarium. Let's start with choosing the soil and stones. How much soil should I fill? To answer this question, just use a calculator. But I suggest you use this formula: the soil should occupy 10% of the volume of the aquarium. That is: if our aquarium is 30 liters, then we add 3 kg of soil. When using this formula, the height of the soil will always be approximately 3cm. Nowadays in the West there is a tendency to have no soil in aquariums, but I would not recommend doing this with salt water.
There are many different types of soil in composition and quality. Again, we advise you to choose based on your preferences and price. Now, in addition to aragonite sand and coral chips, living sand has also appeared. But this will be a waste of money, if you have extra money, then it is better to spend it on additional volume of live stones. When buying sand, know that its fraction depends on the color, so yellow sand is coarser, and white sand is finer. You should also choose sand based on the future inhabitants of the aquarium. For example, if you have fish that dig sand (for example, gobies), then with fine sand they will make all the water cloudy. So for those who like to dig, take a large one. Most often in practice, fine sand is taken into small aquariums, and coral chips or coarse argonite sand into large tanks. When purchasing, it is also important to know that the color of the soil will change over time, so do not pay too much attention to this parameter when purchasing.
Soil and living stones
After this, you can continue launching. Add soil and
Living stones
lay out live stones. Either coral chips or coral sand are ideal. Some lovers advise boiling it in advance - even if you bought it in a store, there is no need to take extra precaution. Naturally, there is no need to boil living stones, otherwise they will quickly cease to be alive!
If you have a marine fish pond, then it is better to lay the soil in it on a slope. Then all the waste from the fish will accumulate mainly in one place, from where it will be relatively easy to remove it. If you are planning a more complex system - a sea reef, then lay the soil so that when cleaning it with a siphon you can reach at least most of its surface.
After laying the soil, turn on the pumps, foam tank and filters. After this, you should leave the pond for at least 2-4 weeks - the formation of a biological environment begins. We wait for the disappearance of ammonium and nitrites and measure the level of nitrates. You must make sure that all your sea water indicators are back to normal.
Next, turn on the light and we can begin populating the reservoir.
After another 2-3 weeks, when you are sure that the water indicators have returned to normal, the water is clear, the fish feel comfortable, you can plant corals.
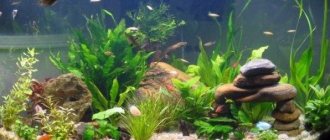
Reef Aquarium
Of course, here you need to proceed from your own preferences. Some people will prefer a large coral reef with a couple of fish, while others will prefer a little scenery and more fish. Therefore, it is difficult to give advice on the number of corals - it is very individual. The same can be said about the types of corals - when purchasing, you need to take into account their compatibility with each other, requirements for water, lighting and the complexity of maintenance.
We suggest you read: Brown algae in an aquarium, how to fight it
Selection of stones for a marine aquarium
This question is very important. So, to choose from we have shell rock, tuff, dry reef stone (DRS), an animated version of the previous stones, and living stones (LC). They can be delivered from the sea by collective order; such fresh stones are called “from the wheels”, and the same ones, only sold ones, are not immediately called over-exposed live stones.
You can make columns and slides in the aquarium yourself using glue and frames; shell rock, tuff, and SRC are suitable for this. You can create your own design for as long as you want, nothing will rush you. But this won’t work with live rocks; you need to buy them when the aquarium is already salted.
The time for your creativity with stones is limited, plus you will need experience in similar work. To quickly prepare and populate your salty pond, take live stones, either “from the wheels” or overexposed ones.
Stones are usually colonized by various microorganisms. It usually takes from 3 to 9 months to settle the stones; this process does not happen instantly, which must always be remembered. Organisms can settle both on the stone and inside it. Also, when you buy a stone, there are already various inhabitants in it and on it. This helps to accelerate the formation of biological balance in your aquarium and create an environment favorable for life.
But living stones also have their downsides. They can release substances into the water that activate the growth of unwanted algae and the problems of growing favorable algae. Also, stones can present a very unpleasant surprise in the form of parasites and diseases, the removal of which will take a lot of time and effort. I have told you the pros and cons of these stones, so decide whether you need them or not.
Difference from freshwater and description
A marine aquarium is an artificial ecosystem that simulates the underwater world. It attracts attention with the colorful appearance of the inhabitants of the oceans and seas, which previously could only be seen with your own eyes in the aquarium, and with a number of additional techniques for decorating the space. You can install both small tanks (about 20 l) and large ones (about 350 l, 450 and 500), requiring the use of a set of additional equipment for:
- monitoring of water parameters;
- cleaning the aquarium from debris;
- the supply of additives that regulate the development of the ecosystem.
You need to take into account the costs of consumables. The main difference with freshwater is the greater sensitivity of those living in seawater to changes in parameters such as temperature, hardness, pH, and levels of trace elements. Organisms accustomed to living in bodies of fresh water do not require such careful care, are cheaper and hardier, therefore, a saltwater aquarium is a solution for experienced aquarists who have proven the ability to care for fish, turtles, and plants.
Photo gallery of marine aquariums:
Changing the water in a freshwater aquarium, which does not require preliminary mixing with salt and settling (24 hours before the procedure), is a simple matter even for beginners. For primary biological filtration, live or dry reef rocks are installed in the marine system. Their surface is a place for the development of beneficial bacteria that assimilate nitrogen and other elements. In the case of freshwater environments, plants perform a similar function.
Choosing a water source for an aquarium
To prepare artificial sea water, you need to have access to distilled water or buy osmosis; the tap water we are used to is not suitable due to its unsatisfactory quality. So, we will prepare water by mixing water and specialized sea salt for aquariums. Running water will not suit us, because it is unknown how the mineral salts from it and the components of specialized salt will behave when mixed, because it is possible to poison the water and creatures. The water mentioned above, suitable for us, has almost no mineral salts in its composition.
If for some reason you do not want to purchase the special water mentioned above, then conduct an analysis of the composition of the running water at the sanitary and epidemiological service of your locality. If the result is good, try it. Thus, we looked at why the choice of a water source is so important and what difficulties it poses.
Starting a marine aquarium. Options for “revitalizing” the system.
Our aquarium is filled with water, now we need to prepare it for future inhabitants by launching natural biological processes. This preparation is called “launch and maturation of the biological filter.”
Why do you need to prepare an aquarium?
Fish and other aquarium organisms usually produce toxic substances in the form of nitrogenous compounds: ammonium/ammonia (this is one substance, but in an acidic environment it exists more in the form of the less dangerous ammonium, and in an alkaline environment it exists more in the form of ammonia, which is the most toxic).
Special bacteria that consume the toxins described above and produce less toxic nitrites will help reduce the toxicity of these substances. But this is not the last stage, since nitrites are also dangerous to the lives of the inhabitants of the aquarium. The next link is again bacteria, but this time feeding on nitrites and releasing nitrates. We have looked at a very simplified diagram of the incomplete nitrogen cycle. But its importance has become clear, and now it is important to find out how to fix it yourself.
Possible options:
- Bookmark LCD or OZhK.
- Laying living soil.
- Introducing a culture of nitrogen cycle bacteria. This is done through the purchase of specialized drugs.
- Add ammonia (ammonia) to the aquarium every day.
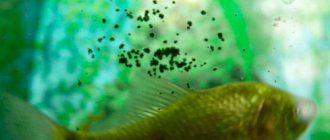
- Add fish food, simulating the feeding of future residents.
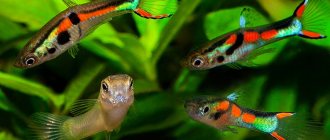
- Plant fish that are resistant to ammonium/ammonia/nitrite/nitrate fluctuations and feed them. Such fish can be freshwater mollies or guppies, which need to be transferred from freshwater to seawater within a week.
The first three options are based on the instant creation of a sufficient population of nitrogen cycle bacteria, plus this method is the rapid maturation of the aquarium. Bacteriologists claim that with the help of drugs (point 3), you can prepare an aquarium in lightning fast time - just one day.
Options 4, 5, 6 are based on the statement that the nitrogen cycle bacteria we need are around us in negligible quantities. This method comes down to growing the bacteria we need. We must provide them with food, and the bacteria themselves will begin to multiply and process toxins into less dangerous substances.
Combine the methods discussed above, the results will be excellent.
How does the maturation process of a marine aquarium occur? What to expect?
The system matures in six months to a year, while the nitrogen cycle and other more complex processes that are not currently considered by us, normal for the natural conditions of existence of organisms, are established. These processes are impossible to see; they can only be assessed by collecting seawater and testing it, as well as observing visual changes. What visual changes can we observe?
Diatoms grow on various surfaces (sand, stones, etc.); they are an unpleasant brown mucus. But these algae will not always be in the aquarium; they will disappear on their own within a few days or weeks after their appearance. They will be replaced by green filamentous and red mucus-like algae.
Algae looks ugly, but there is no way to do without this process, and after it your aquarium will become the way you imagined it. If large accumulations of such algae have formed, then you can remove them with your hands or with a siphon tube; this will not interfere with the development of biological processes.
It is important to monitor salt water parameters such as density, temperature, ammonia, nitrites, nitrates and phosphates. Every 7 days, change 10-15% of the water; the water you prepared for replacement should also be of proper quality. It is advisable to add such types of macroalgae as chaetamorpha, caulerpa, etc. to the aquarium; thanks to them, the number of unwanted microalgae in your mini-reservoir will decrease.
By the way, read this article about how to deal with unwanted algae in an aquarium.
Water quality
Many factors indicate the condition of the water: the amount of algae, phosphates, nitrates, nitrites and calcium. These indicators can be regulated by installing special equipment in the aquarium. Among the most popular devices are the following:
Scrubber
It can be used to purify aquarium water from high levels of phosphates and nitrates. The principle of its operation is that, passing through the scrubber pump, water flows over the surface of the filter on which algae grows. As a result of the vital activity of algae, the water is cleared of fish waste products, nitrates and phosphates. The installation of this equipment can improve the development of corals and other aquatic organisms living in the reservoir.
The scrubber structure must be periodically washed under running water, leaving a small amount of algae on its walls.
Calcium reactor
Stony corals living in an aquarium consume large amounts of calcium in the water during their life. The use of equipment contributes to the saturation of water with calcium and carbonates. This became possible due to the fact that the reactor fill contains these elements. As a result of this process, the level of carbonate hardness of water increases. To determine the need to use a calcium reactor, it is recommended to periodically measure the amount of carbonate hardness and calcium in salt water. If the level of carbonate hardness does not fall below 7 dKH, and the amount of calcium in the water is less than 400 mg/l, there is no need to use a calcium reactor.
A calcium reactor is equipment that in some cases can be dispensed with.
Balling method
An alternative to using a calcium reactor is the balling technique. Its essence is to use 3 containers, each of which is filled with solutions prepared in advance. Solutions are introduced into the aquarium one at a time at a certain interval (10, 20, 30 or 120 minutes), using a special dispenser for this. The size of each dose of solution is determined experimentally. It depends on the number of inhabitants of the aquarium and their appetite. Using this method allows you to maintain the amount of calcium and potassium in the salt water of a marine aquarium within normal limits.
Kalkwasser
Hydrobionts living in an aquarium consume quite a large amount of calcium and carbonates. To replenish them, a kalkwasser solution saturated with calcium hydroxide is used. Since the solution has the ability to react with oxygen, it must be kept in bags without access to air.
You can purchase a kalkwasser in specialized stores in your city or on the Internet.
Penny
Despite the fact that the water in the aquarium is periodically replaced by 40–50%, it cannot remain crystal clear for a long time. This is due to the vital activity of the living inhabitants of the reservoir: the body of fish is covered with mucus, corals have the ability to secrete mucus; Many aquarium inhabitants release toxic substances into the water to protect themselves from predators. These are just some of the reasons why the water, a short time after changing it, becomes dirty again, and a layer of foam appears on its surface. If this foam is not removed in a timely manner, the water will acquire a terrible odor, and the inhabitants may die. For this purpose, a special device is used - a foam pen. Water enters the lifting bowl of the foam bowl, which, passing through the filter, is cleaned of foam and toxins. Thus, the action of foam helps to cleanse water of toxins and also eliminates bad odors.
Foam on the surface of the water is dangerous to the health and life of marine life.
Filters
Since the aquarium is considered a closed space, toxic substances accumulate in it. The reason for this process is the accumulation of food residues at the bottom of the reservoir, the breakdown of organic matter. To maintain comfortable conditions in the aquarium, they must be periodically removed through the use of filters. There are many types of filters designed to purify water in a marine aquarium . Among the most common types are external (canister) filters. Its design consists of a container with a special filler containing coal. Passing through it, the water is not only purified, but also disinfected. This type of equipment is located directly under the container. A saltwater aquarium with an external filter will always have beautiful, clean water.
Filter is a water purification system.
Skimmer (florist)
One of the types of filters. This equipment is designed to purify water in a marine aquarium from dirt, proteins and phosphates, dead algae and other living organisms. The skimmer also helps to reactivate the algae growth process, which also helps maintain the water in good condition.
Appearance of a skimmer in an aquarium
The listed special equipment for a marine aquarium provides comfortable conditions for its inhabitants and maintains the water in proper condition. After the aquarium is equipped and launched, you can place stones, corals, sea fish and other inhabitants into it.
Settling a marine aquarium
Launch the first inhabitants (the most stable) with the following test results: ammonia and nitrites = 0, nitrates - less than 50. If you want to launch corals, then the nitrate level is more stringently required, so it should be below 20.
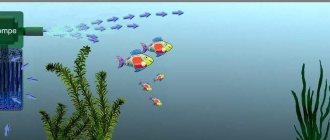
It is advisable to start populating your home underwater world with hermit crabs, snails, brittle stars, and add fish from the list for beginners presented at the beginning of the article. Since we have just built the necessary biological processes, add no more than 2-3 fish at a time so as not to upset the fragile balance of the system.
Stages of populating a marine aquarium:
- After start:
- First settlement:
- Amphiprion ocellaris ———-2 — 15x2x2=60 liters
- Chromis viridis ——————-3 —- 10x3x2=60 liters
- Moving in after 1-2 months:
- First settlement:
- Escenius bicolor ——————1 — 8x1x2=16 liters
- Second placement for the 1st-3rd month:
- Amblyeleotris guttata (or japonicus, or latifasciata, or steinitzi) or Cryptocentrus cinctus + shrimp Alpheus bellulus or Stonogobiops nematodes + Alpheus randalli - 8x1x2=16 liters
- Nemateleotris magnifica ——2 —9x2x2=36 liters
- Third placement for the 6th month:
- Pterosinchiropus splendidus—1+1 (male and female)—-6x2x2=24 liters
- Centropyge bispinosus –1 —12x1x2=24 liters
TOTAL: 60+60+16+16+36+24+24=236
The fish from the third addition are the most demanding in terms of conditions, so at the time of their addition the system in the aquarium should already be established, so add them in the 6th month. Moving in is possible in less than 6 months, but only if you are sure that the system you have built is stable.
How to properly introduce animals into an aquarium?
When transporting fish from the store, the bag should not be completely filled with water, 1/3 or 1/4 of the volume is enough, the remaining space should be filled with oxygen or air. The temperature in the bag differs from that in our aquarium, so we begin the introduction by placing the bag in the aquarium to equalize it and get the pet accustomed to the temperature. Over the next half hour, we make the water indicators in the bag identical to those of the aquarium. You can do this by using a dropper or adding small portions of water every 3-5 minutes. When correctly performing the stages of transportation and acclimatization of the future resident of your aquarium, it is important to do everything correctly, because this directly affects his health. As soon as we have equalized all the necessary indicators, we can stock invertebrates and corals, but we should not immediately send the fish to the main aquarium, it is better to place them in quarantine; this stage will take 3 weeks. Then we will reduce the likelihood of infection of the creatures of your underwater world in the main aquarium to zero.
For convenience, we advise you to write down the stages of populating the main aquarium (usually 3-4 points); at each stage, write down which pets you will add. It is important to follow all steps of your plan. If you are offered the opportunity to acquire an interesting resident, approach it head-on, weighing the pros and cons. After all, you can harm your pets.
Take care of your pets and they will make you happy!