A hamster is a fluffy creature with short legs and a cute face, which is often given as a gift to children as a living toy. To make your hamster feel comfortable and healthy, you should provide him with care and a cozy environment. It is not necessary to buy items for the rodent in the store. Ready-made crafts and step-by-step master classes will help you choose an idea for what can be made from cardboard for a hamster.
- The need to create a cozy environment for the hamster
- Examples of ready-made cardboard crafts
- What can you make from cardboard for a hamster?
- Required materials and tools
- House master class step by step
- Video master class
- Step-by-step instructions on how to make a labyrinth
- Video master class
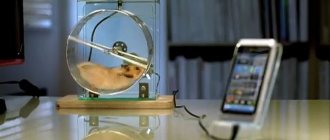
- Simple wheel made from corrugated cardboard
Master classes on making toys
In order for your “fluffy” not to be sad, it is not at all necessary to buy him expensive toys; all the things for a pleasant pastime of the hamster, with which he will happily play, can be made independently, with your own hands.
Homemade staircase
Very often, hamsters chew through the wheel in the form of a lattice. But don’t rush to throw it away after that - it will make an excellent staircase that you can make with your own hands.
The excess spokes on the sides of the wheel are cut off, then the ring is opened and the crossbars are cut off one at a time. Using a lighter, the middle of the former wheel is slightly melted to the point of creating a bowing bridge. The edges of the ladder are also heated over an open fire and bent like hooks so that the product can be easily hung in the cage.
Tunnel
Hamsters love to climb into narrow spaces. You can make a homemade tunnel with your own hands from wood or even from ordinary durable cardboard and electrical tape.
The cardboard is bent into a tube of such a diameter that a hamster can freely crawl into it. To keep this tube in place, tape its edges. It is better to secure the resulting tunnel with electrical tape at the bottom of the cage so that it is convenient for the hamster to get through it.
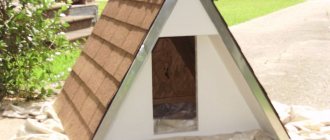
Two-story house
To create a house you will need wood plywood, preferably poplar. The dimensions of the roof will be 25 by 12 cm, the walls will be 10 by 10 cm, except for the back, which will be 25 by 10 cm.
A hole is made in the first side, and an opening for the valve is marked on the second and rear. Now blanks are cut out using the marked material and glued together. We fix the roof and turn the created structure over. From the inside we mark places for future slats and glue them.
To create a second floor, a hole is made in the roof and a smaller box glued together from the same plywood is placed.
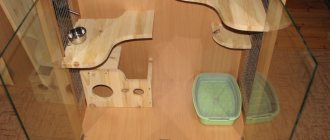
Maze and obstacles
An obstacle maze can be one of the most entertaining and long-lasting entertainment for your pet, a place where he can play. And it’s quite simple to do. Along the way, it is better to place not only obstacles, but also tasty treats.
To create a labyrinth with your own hands, you will need a decent-sized cardboard box, paper with a beautiful ornament, wooden borders, a measuring ruler, glue, and scissors.
You cannot use special “Moment” glue to make toys and houses. It can cause health problems for the animal.
The walls will be about 15 cm, just enough to prevent the hamster from climbing over them. It is at this level that we cut off the box from above, and then make one exit. For beauty from the inside, it is better to cover the structure with decorative paper.
Now you need to make the inner walls of the labyrinth from curbs or plywood. To secure them, it is better not to use PVA glue, since in this case the hamster can simply break the walls while running around. Obstacles can be small slides made of the same plywood or tunnels in the form of twisted cardboard. You need to wait until the glue dries and place tasty treats for the hamster in different parts of the structure so that he is more willing to explore the entire maze and eventually find a way out of it.
The need to create a cozy environment for the hamster
Despite the fact that a hamster really looks like a fluffy toy, in fact it is a very fragile creature that needs careful treatment and care.
The rodent's body is very delicate and can be easily damaged. You should definitely talk about this with your children in advance.
With a sedentary lifestyle, Djungarians are prone to obesity. That is why pet stores offer a wide range of different accessories that make animals move more. These are various labyrinths, tunnels, stairs, swings, running wheels. However, you can also make all sorts of things for hamsters from cardboard with your own hands.
Most often, DIY hamster crafts are made for 2 purposes:
- stimulating animal activity;
- search for treats.
The dimensions of the crafts must match the animal so that it can move freely without getting stuck between the structural elements.
Examples of ready-made cardboard crafts
Options for ready-made homemade products will help you choose an interesting idea of what can be made from cardboard for a hamster, how to decorate your pet’s home in an interesting way, design toys and objects that encourage the hamster to be active.
- a maze for a hamster made of cardboard with built-in ladders, tunnels, and slides.
- Running wheel made of corrugated cardboard.
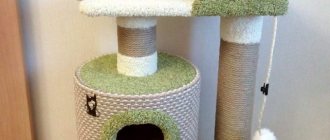
- A two-story cardboard house for a hamster, made using decorative paper.
- Balls made from cardboard tubes with treats inside.
- Tunnels made of bushings with slots for active crawling and searching for food.
- A small cardboard house that looks like a real one.
- Cardboard furniture.
Homemade toys from waste
Even real garbage can be used as starting materials for toys. The main thing is the quality of the product, so that the hamster becomes interested in it and does not break it when it starts playing there for the first time.
Walnut shell toy
To create such a toy, you need several walnut shells and threads of the length that the resulting thing should be. Instead of thread, a thin, strong rope will do.
Next, you need to take a hammer and a nail, with which you make a hole in all the shells. Walnut shells have a structure that makes it easy to punch a hole in it without it breaking into pieces. It is advisable that an adult handle this task, otherwise a child who decides to make a toy for a hamster may accidentally hit himself on the finger with a hammer. A thread is threaded through the punched holes until all the shells fit onto it. In this case, it is better to make sure that the thread is hammered in tightly enough and does not dangle too loosely. To prevent the shell from moving off the rope, a washer is attached to one end, and the other end is tied at the top of the cage.
To help your pet start playing sooner, you can put his favorite treats inside the shells. Such a thing performs three useful functions at once: it allows the hamster to grind its claws, develops intelligence and simply helps to kill time.
How to teach a hamster to bathe in sand
If this is your first time placing your pet in a sand bath, difficulties may arise. For example, he will simply ignore the bathing suit and crawl out of there, not knowing what to do. Teaching a hamster to bathe in sand takes time. Usually, to do this, they place the bathing suit directly in the cage and wait until the pet begins to interact with it, and then bathe. The main thing: do not place your pet in this container every minute, wanting to speed up the process, because with such actions you will simply scare him away.
Did you know? Hamsters are quite smart animals and can even remember a few tricks.
Wooden toys
The first thing you need to do is take a block of wood and cut out a piece of suitable size from it, about 12 by 8 cm. The surface of the future toy is processed with sandpaper, and the edges are rounded so that the hamster does not get hurt.
Using a feather drill, a pair of indentations are made to approximately half the thickness of the workpiece. Next, two squares of plywood are cut out, which will be the size to cover the created recesses. Their corners are also rounded and the squares are attached to the main workpiece using screws. At the same time, they should open and close so that the hamster can move them with moderate effort. And he will need to open these recesses in order to find tasty food there. An excellent toy that simultaneously develops your pet's thinking and gives him the opportunity to get some good exercise.
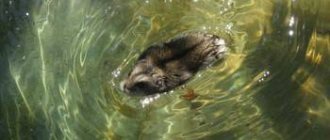
Water activities for rats
Pea fishing is a great water game for rats. Place a cloth in the entertainment area, then take a bag of frozen peas and place a handful in a shallow ceramic or glass bowl of cool water. Add some large, smooth rocks for your rat to climb on. Show the rats their new pool. Now you can watch them jump into the water and dive for peas, or sit on the edge playing with the peas with their front paws, or just lie in the water and eat the peas they retrieved.
Your water-loving rats will love the opportunity to swim and snack at the same time. And those who are afraid of water will be able to sit calmly on a rock or on the edge of a pool and catch peas floating by.
Video “Maze or how to make a funny toy for a hamster”
How to create real entertainment for your small pet with your own hands, a toy with which he can play.
Sorry, there are no surveys available at this time.
Was this article helpful?
Thank you for your opinion!
The article was useful. Please share the information with your friends.
Yes (100.00%)
No
X
Please write what is wrong and leave recommendations on the article
Cancel reply
Rate the benefit of the article: Rate the author ( 7 votes, average: 4.57 out of 5)
Discuss the article:
Maze for rats
You can build the following types of labyrinths:
- A labyrinth of pipes.
Fabric tubes are ideal for creating complex mazes for your rats. Go to your local hardware store for a variety of PVC pipes that are at least 2 inches wide. Connect corner pipes, straight pipes, and their connectors in any order to create a tunnel maze. You can also make fabric tunnels by cutting off the legs or sleeves of old clothes and stuffing them with toilet paper tubes.
However, PVC ones are better for rats that like to chew a lot, while a fabric tunnel allows you to keep an eye on where your rat is in the maze.
Simply separate the fabric tubes from each other when you are ready to remove the play area. You can create a different kind of maze the next time you release the rats.
- Labyrinth of boxes.
Rats love to climb and climb, so you can stack boxes to create a maze. But the structure must be strong enough to climb without collapsing under the weight of your rats. If you're feeling ambitious, try training your rat to jump through hoops, ramps, and other openings.
Use treats or moving objects to guide her through a route or maze. Rats will instinctively chase anything that moves quickly, so use string, feathers, or small crushed balls.
What is a hammock for?
A hammock is a suspended piece of dense fabric on which a rodent is placed. At first glance, this piece of furniture will seem useless to you, but in fact it can be used in various situations. For example:
- On such a chic attraction, you can quietly rock the homa, which will entertain your furry friend.
- The hammock can also be turned into a resting place where the fluffy will sleep.
- If the cage has a retractable bottom, then during tidying you can transplant the furry miracle into the hammock, rather than removing it from the cage.
- Some store-bought “beds” have additional climbing frames.
Let us remind you that dzhungariki are cheap, from 50 to 150 rubles. But hamster interior items are sometimes a little expensive. For example, for a hanging hammock with a pair of ladders in a store they will ask you for at least 900 rubles!
Whether the entertainment is worth that kind of money is up to you to decide. But it’s much more economical to make a hammock hammock with your own hands. This won't take much time if you have basic sewing skills. But the process of creating a cozy bed for a home can be a lot of fun!
Intellectual games for rats
Gathering and scavenging are natural behaviors of these rodents and should be a regular part of their foraging pattern. A food puzzle is an easy way to develop this behavior.
But the market for rat food puzzles is somewhat limited. However, toys designed for other small animals can easily be used. Make sure the toy is the right size: small enough that the rat can't get inside and get stuck, or large enough that he can maneuver it easily once inside.
Supervise all interactions with food puzzles to ensure your rat's safety. Use only foods recommended by your veterinarian and be sure to measure portion sizes. To get your rat interested in a toy or food puzzle, you can cover the outside of it with something edible. Cream cheese and yogurt can be used in small quantities to entice your rat to play with the toy. However, keep in mind that these foods have no nutritional value and should not form a significant portion of your rat's actual diet.
And remember that the edibles served in the food puzzle should be considered part of your rat's daily diet to maintain his healthy weight.
Making a hammock yourself
Before you get started, you need to think through each stage of the work. For this:
- draw what you want to get in the end;
- think over the design of the future hammock;
- select durable materials and tools;
- bring your plans to life.
To make the bed for your furry friend safe and last a long time, pay special attention to the selection of materials. Hammocks are different, so the “raw materials” for them are different.
You can use the following materials:
- Durable yarn.
- An old washcloth.
- Special fabrics.
- Plastic parts.
- Metal carbines.
The choice of tool for creating it depends on the type of crib. This can be a sewing machine or a regular needle, knitting needles or a hook.
We offer you several types of hammocks to choose from.
From yarn
There is nothing easier than making a hanging crib for your furry pet from yarn. Of course, if you know how to knit or crochet. The yarn should be strong, it is better to take wool mixture or acrylic. Select the knitting needles and hook in such a way that no large holes remain when knitting.
If you are using a crochet hook, crochet a rectangle or square with a single crochet. In the case of knitting needles, you can knit using garter stitch or stockinette stitch. Simply tie a square or rectangular piece of fabric and attach it to the bars of the cage. The hammock is ready, you can put your hamster in it!
The downside of a knitted bed is its fragility. After all, fluffies love to try everything with their teeth: it’s enough to gnaw through one loop and the fabric will unravel. Therefore, keep an eye on your pet while he is resting and do not let him chew the furniture!
From a washcloth
Probably many people have old cloth washcloths at home. They are woven laces knitted into a mesh. You can use this washcloth under your hamster's bed. But first you have to find the body.
It is better to use metal or plastic parts as the body. If you don't have anything suitable at hand, use thick wire. Rectangular parts are suitable, but the ideal shape is an oval.
All you need to do is stretch a piece of old washcloth over the body, secure it and hang the crib in the cage! On such a cozy bed you can first have a snack and then relax. Like in the old Soviet cartoon: after eating, you can sleep!
From fabric
The most difficult option to implement, but, as practice has shown, such hammocks last much longer. Now you will learn how to make a fabric hammock for a hamster.
Basic requirements for the material:
- the fabric must be strong and dense, not capable of forming “arrows”;
- It is better to choose a soft lining.
To implement the idea you will need a sewing machine. In the absence of one, you can sew with a needle, but machine stitches still look neater, and the process goes tens of times faster. You will also need scissors, thick braid, pins, blue lining (or other soft material) and small metal snap hooks. The width of the ribbon must be at least 2 cm.
Here are step-by-step instructions for creating a hammock:
- Cut out 2 squares of fabric with a side of 15 cm. These parts are the top and bottom sides of the future crib. Along the sides of the square, cut some fabric in an arc to give the product an interesting shape.
- Cut a square of the same size from padding polyester or other soft material. It will give the crib softness.
- Cut the ribbon into 4 identical strips 30 cm long.
- Stack the squares on top of each other so that the soft fabric is hidden inside.
- Secure the squares with pins.
- Then sew ribbons to each side so that the cuts are hidden. You will still have long ends of ribbon, as long as you don't cut them off!
- Thread the ends of the ribbons into the carabiners. Attention! At this stage, fitting is needed! Adjust the length of the ribbons, connect 2 adjacent ends into a loop.
- Sew where the ribbons join and cut off the excess ends.
- Attach a small metal clip to each corner of the square.
- Make fastenings and trim the protruding threads so that they do not interfere and do not spoil the appearance.
So, your comfortable hammock is ready! Invite your hamster to evaluate your efforts!
Attention! Sizes are indicated for miniature dwarfs and Roborovsky hamsters! If you need a hammock for a Syrian hamster, make the side of the square 20 cm.
Delicious "walnut" staircase
From the empty shells of several walnuts you can make an excellent toy for your pet. In addition to the empty shell halves, you need to prepare in advance:
- a thin nail with a sharp end;
- hammer;
- a strong thread as long as the height of the cell;
- medium size washer.
In all prepared half-shells, you need to carefully make a hole in the center. This is done by driving a nail (there is no need to leave it in the resulting hole). You need to thread a thread through the holes to make the shells into a kind of beads. An important nuance - all halves must be turned in one direction, with the exception of the last one. In a vertical position, the beads look like a stack of bowls standing on a tubercle.
A washer is tied to the end of the thread coming out of the last (lower) shell so that the thread is securely fastened and the structure does not fall apart. The upper end of the thread is tied to the “ceiling” of the cage so that the lower shell lies on the bottom, but the “beads” do not sag. You need to put treats for the hamster in all the resulting bowls. Climbing the structure, the pet will take away a tasty prize at each stage of “conquering the peak”.
The height of the structure must be respected. Hamsters climb beautifully, but they descend simply by jumping. Therefore, you should not use shells from more than several nuts for one construction. In addition, it is important to provide your pet with a soft landing - the bedding in the area of the toy should be thick.