Every owner knows that no matter how easy it is to care for a pet, the cat still requires attention and proper maintenance.
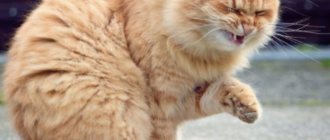
In a house where a cat lives, a scratching post is one of the main attributes. With the help of this accessory, the pet can sharpen its claws, and the cat owner will ensure the safety of the furniture and walls in the house.
Why do you need a scratching post?
In nature, claw marks of lions, tigers, and leopards are found on tree branches, high from the ground. Domestic cats have retained the habits of their wild relatives. She:
- necessary for cleaning claws from worn outer horny film;
- scratches will tell relatives: there is a representative of the species here;
- accompanies stretching;
- attracts attention.
Sharpening claws is a natural need for a cat
Not vitally important, like eating, sleeping or going to the litter box, but scratch marks will cause the animal to lose a significant amount of comfort. Owners have to regularly change chairs, upholstery on upholstered furniture, and throw out boxes. Purchasing a cat scratcher will help in part. How to choose her so that she will be successful with the beast?
- choose a covering: from corrugated cardboard to sisal, as long as the animal likes it;
- find a comfortable place - one where your pet likes to sharpen its claws, but don’t forget about yourself, everyone makes this choice together;
- think about the shape, color and fastening.
You may be able to find one that is approximately suitable at a pet store. But purchased products are disposable and will soon deteriorate with intensive use. It’s possible to make a repairable cat house with your own hands.
What's the use of it
There really are a lot of advantages to such an unusual toy. We'll deal with everyone. To put it very simply, a food puzzle is a food dispenser, that’s all. But…
Your pet will eat more slowly - and this is the key to his health and the foundation of longevity. And at the same time move a lot and invent ways to obtain food “hunting”.
By the way, zoologists agree that this type of nutrition is more correct than with free access to dry food.
- If your pet has problems with excess weight, this useful device will help reduce the amount of food eaten and ensure the burning of excess weight through greater physical activity.
- May help animals prone to vomiting from haste while eating. This toy feeder encourages leisurely eating of food or treats.
- It forces you not only to exert physical effort, but also trains your cat’s intelligence. A homemade food puzzle for a cat will make it more active, dexterous, and smarter.
The principle of operation is this: the cat needs to think and act on the toy in a certain way in order to get the treasured treat. Food puzzles perfectly develop logical thinking and the “hunter” instinct.
In the wild, it is unlikely that you will come across a bowl filled with mice. And with such a toy, a whole world of adventure is open to the cat.
Physical activity increases and a new hobby appears that will protect your curtains and sofa from an overly active animal. In addition, this is a great activity for those times when our cat is left to his own devices. For example, when it’s night outside or the owners leave and leave the animal alone.
Shapes of scratches
How to design a cat scratcher? It depends on the size of the apartment, the cat’s manners and the imagination of the owners. Experts in cat psychology say: animals need to periodically remain alone where they can be found - at heights. Cat climbing frames are suitable for this:
- “cat trees” - branched structures with shelter,
- the cat house can be placed on the floor - with surfaces for “manicure” inside, on the roof or on the base of the structure;
- thin shelves mounted on the wall with covering in separate areas for claw points;
- flat or volumetric wall scratching post.
Choose a form factor based on the safety requirements of the animal and convenience for humans. Let's look at how to make a scratching post yourself from scrap materials. You have to make a set of elements and connect them in a certain sequence.
Two in one: scratching post-vase
Such a scratching post performs two functions at once - an indispensable device for a cat and a luxurious decorative floor vase.
Prepare a ceramic vase of any size and shape, as well as a ball of sisal rope. The vase should be quite heavy and durable. Avoid glass varieties!
Wrap the rope evenly and as tightly as possible around the vase using hot glue.
Almost the finish line, but the most important part is ahead, because the main thing is that our structure is stable. Let's fill the vase with different stones and other various weighting materials. And for reliable stability, we attach slate tiles to the bottom.
The scratching post-vase is ready! All that remains is to decorate it with beautiful branches and accustom your pet to the new device.
Top part
We have already stated that the pet chooses the upholstery. How to line a cat house or cover a surface for sharpening claws:
- carpet - cheap fabric for a scratching post, average maintenance, technically the most difficult to replace;
- jute rope - inexpensive, easy to replace, short-lived;
- sisal - the most durable, but also expensive;
- corrugated cardboard - cheap, but short-lived;
- with a wooden block - few people like it, but the labor costs when working with it are minimal.
Animals, of course, do not differentiate between sisal and jute (by the way, if you decide to try jute and like it, you can then replace the rope with sisal). Few people prefer unsanded wood, but sometimes it is the ideal scratching post for cats.
Floor scratching post
Making a horizontal version of a scratching post is as easy as shelling pears. For this project, prepare a base board, a couple of pieces of wood for the side, twine, 4 screws, drill bits, and a stapler.
We attach the sides to the main board.
We wrap the twine around the board, securing it with staples using a stapler. First you need to drill two holes in the corners on both opposite sides of the body in order to thread and tie the ends of the twine into knots.
Introducing your pet to the new thing!
Base options
Item needed:
- strong enough to support the weight of the animal;
- lightweight so that bulky structures are not required for mounting to the wall;
- Receptive to glue well, good for processing with tools.
Cheapness is an important parameter, but not as much as for coating. The base is expected to last a long time. Is this always necessary? Assess the complexity and wear time of the craft. It may turn out that it is more rational to replace it completely than to remove the glue.
For the base take:
Note!
Kinusaiga technique for beginners: what is it, a description of creating paintings from threads
How to weave a figurine from rubber bands: how to learn to weave animals, toys and what you can make from rubber bands on a slingshot
How to make flowers with your own hands from paper, fabric and scrap materials. We create bouquets of homemade artificial flowers
- plastic water and sewer pipes - they are easily sawed across and lengthwise, it is easy to make a frame of any shape from them with reliable fastenings from standard adapters;
- pieces of plywood of various thicknesses;
- sections of tree branches after sanitary pruning at the dacha (necessarily healthy fragments, so as not to bring pests into the house).
The branches can also be used for decoration: a cat lying on them, attached to the ceiling, will decorate any apartment.
“Home tree” for a cat
Active animals love to climb trees. So why not try making a tree for your pet right at home? At the same time, decorate the interior with a living natural corner.
First, let's make rough sketches of the future design.
Tools and materials:
- tree trunks;
- sisal for scratching post;
- plywood;
- pine for edging the base and platforms;
- decorative stones;
- faux fur fabric;
- dye;
- hand saw;
- Miter saw;
- drill;
- manual stapler;
- liquid nails (construction glue);
- screws;
- various screws and nails.
We process the trunks for the frame. They must be completely dry.
The next stage is finishing the base (base of the structure) and installing the trunks.
Pre-drill holes in appropriate places. Then we attach the branches to the plywood (our base) using screws and liquid nails at the bottom of each trunk. Next, we line up pine sides around the perimeter. We finish with a polyurethane and gloss coating.
We make and install scratching posts. For them we use wooden dowels, which we paint in the same color as the base, after which we fasten sisal ropes in a circle.
At the bottom, we strengthen each dowel with liquid nails and screw them into our base, just like the trunks.
The next step is to create platforms of various forms. We use pine as the main material. One of the shelves can be upholstered with fabric with faux fur. We cover the lower ones with a polyurethane layer, similar to the base.
We install platforms. To do this, we use screws and liquid nails (a hammer and nails will also work).
Final details. We fill our base with beautiful stones of different sizes. We decorate the tree with a climbing plant, toys for the kitten, and “home nature” is ready to receive its inhabitants!
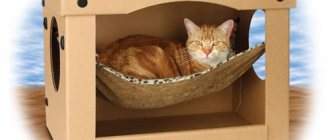
Horizontals
They are divided into shelves for walking, areas for resting or placing a “birdhouse” and hammocks.
The platforms can also serve as steps to make it easier for your pet to climb to the very top of the structure. They are made from plywood. Sheets Ш1 or Ш2 are suitable, any grade except IV (falling out knots and cracks will affect the strength), birch is better than pine needles (cats are sensitive to odors), moisture and fire resistance do not matter.
The recommended thickness is from 6 (if you have a not too large cat) to 10 mm. Covering them with a covering for the claw point is worth it if the structure will be on the floor. In other cases it is a matter of taste. The technology is the same as for vertical surfaces.
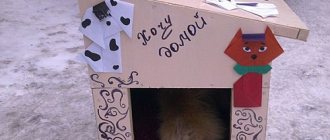
cat house
This is a shelter with a single entrance, located far from the routes of people, higher above the floor. Dimensional diagrams and drawings can be found at the end of the article. Cats love boxes. Your task is to create something similar, but one that fits into the interior.
If you plan to place the house on a cat tree, take care of its stability and balancing issues, but for this it is enough to have a building level and at least three support points for the plywood base.Tips on how to make a cat house spend a lot of time on interior and exterior upholstery. An external one can be useful for a furry pet to sharpen its claws - but only if the shelter is not located at a height.
Otherwise, decorate it however you want. What will be useful inside is not upholstery, but a mattress that fits the internal size of the floor, possibly with sides. It can be taken out and washed. The animal doesn’t care, and it’s much easier to maintain hygiene.
Is it worth purchasing used items?
Some owners make just such a decision in the hope of saving money. But this is a fundamentally wrong approach, because objects may smell like other people’s animals, which will most likely only scare away yours. And no one can guarantee the health and hygiene of the previous user of the accessory, thereby you risk infecting your cat with unpleasant diseases.
For creative people, creating a scratching post for your pet will only be a joy. You can completely rely on your imagination and come up with its design yourself. A creative approach to work will help you create an interesting and original household item that will adequately and harmoniously decorate the interior of the room.
How to make a cat house with a scratching post
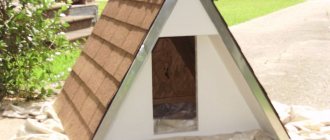
How to make a house for a cat with a scratching post? A shelter located in a cat tree cannot function as a scratching post. Therefore it must be on the floor. The shape of the cat’s home in this case should be either cylindrical or with a gable roof.
In the first case, a PVC sewer pipe is suitable. They come in diameters of 300, 400 and 500 mm. They cover the outside of the tube in the same way as vertical scratching posts. The second one will require plywood. Make the roof higher and longer.
Crafts made from corrugated cardboard
The simplest scratching post for cats is made from corrugated cardboard. To do this, unfold an ordinary box and cut it into strips 8-12 cm wide. Then they are either glued together in layers or rolled into a “snail”. It is often recommended to fasten the layers together with PVA glue, but pets lick and chew such products, so make a starch paste at home.
soft hill
A wonderful structure for a cat consisting of two soft platforms will become your pet’s favorite place.
Prepare two boards of different widths and lengths, pallets for two rectangular wooden platforms, screws, carpet, drills. We take measurements.
We wrap a carpet around our future platforms. We fix it with screws (you can use a stapler and staples). Trim off excess carpet.
We install wooden posts. One of them will be slightly inclined.
For a scratching post, you can wrap the stand with the same carpet, or you can use sisal lace, similar to the previous options.
A cozy corner will delight your pet!
Fastening
What fasteners are made of depends on the shape of the product. If you choose plywood, make sure to provide space for tight hinges and place them on glue before you begin to attach the outer covering.
If the base is voluminous, then a plastic clamp or metal tape will do. Please note that the craft will have to be periodically removed from the wall, so a detachable mount is preferable.
Shelves with scratchers for cats are attached like any other shelves; they can be additionally secured with triangles made of plywood.
A DIY scratching post is the best method to get what you and your cats need. If you're not sure which design will work, start with corrugated cardboard. This is short-lived, but it will allow you to decide on your pet’s tastes before making a more complex stationary structure.
Stylish and simple design
Quite simple, but no less stylish and at the same time universal design of the scratching post will suit both your cat and your home interior.
What you will need: carpet, wood stand, platform, sisal rope and stapler.
We cut the carpet for upholstery of the platform. We fasten it with a stapler.
We measure out the carpet to cover the counter. We cut it and attach it only to its upper part.
Now it’s the turn of the sisal rope. They can be used to wrap not only the base, but also the top of the stand, right on top of the carpet itself. So, the design looks more interesting and relaxed.
Here is the finished result!
DIY scratching post: photo examples of beautiful options
Please repost
0