Setting up a home pond is fraught with difficulties depending on the size of the aquarium and its inhabitants. Many people worry that the stand won't support the weight. But there are cabinets for aquariums that can hold several hundredweight.
Selection of materials and accessories
Making a cabinet for an aquarium requires first creating a drawing and assessing the requirements that apply to it. The aquarium is always filled with water, and it can contain from 100 to 300 liters of water, so the cabinet on which it will be installed must easily cope with such a significant load so that there is no possibility of falling.
Before creating such a cabinet, the requirements for it must be taken into account:
- must easily cope with the planned loads, so you should first decide whether an aquarium of 200 liters or more will be installed, and it is recommended to make a product that can withstand a slightly larger load than the weight of the aquarium;
- there must be special reinforcing elements installed vertically under the cover, which guarantees no sagging;
- if you select a large aquarium of 200 liters or more, then a metal frame will certainly be made to take most of the load from the structure;
- the attractive appearance of the bedside table is an important parameter, so it should fit well into the interior and have an interesting design.
The most popular materials for creating such a bedside table yourself are chipboard, natural wood or MDF, and if the aquarium is too heavy, then a special frame is additionally made of durable metal.
If the capacity of the aquarium does not exceed 100 liters, then the use of plywood and wooden blocks is considered optimal, so the following materials are prepared for the work:
- wooden blocks;
- plywood, and to make the aquarium cabinet strong and durable, it is recommended to choose sheets with a thickness of 10 mm or more;
- self-tapping screws, and the best choice is considered to be fasteners designed for working with wood;
- waterproof paint, and you need to make sure that the composition does not contain any harmful substances, since the product coated with this material will be used in a residential area;
- decorative strip;
- varnish and drying oil.
Often, even a bedside table intended for installing an aquarium is equipped with various additional elements, such as shelves or drawers, and in this case you should choose high-quality, attractive and reliable fittings that will be convenient to use.
Timber blanks
Chipboards
Posts and crossbars
Varieties
Coasters come in different shapes and sizes. Role played by:
- container size;
- quantity of inventory and equipment;
- wishes and imagination of the aquarist.
By shape
- rectangular;
- corner;
- curly;
To size
The cabinet matches the size of the aquarium or exceeds it. Depending on the tank, the tabletop can be 60 by 60 cm or 150 by 50 cm. The bedside table for the aquarium reaches a height of 70–90 cm, including the legs. This height will ensure observation of the underwater world in a sitting position.
According to the material of manufacture
Applicable:
- Chipboard (chipboard). Made from sawdust and shavings. The binder is formaldehyde resin.
- LDSP (laminated chipboard, “melamine board”). Chipboard covered with a layer of polymers. Moisture-resistant material.
- MDF (from the English. Medium Density Fiberboard). Durable and waterproof material made from wood dust bonded with paraffin and lignin.
- Natural wood.
- Durable metals.
Preparation of the drawing
Before the actual work, it is important to make a special drawing according to which all stages of the process are implemented. If you do not have the skills to independently draw up drawings and diagrams, you can use special programs, and it is also possible to find suitable ready-made drawings.
During the creation of the drawing, the main issues regarding the future design are resolved:
- dimensions, and they must be optimal so that you can easily install an aquarium of a certain shape and dimensions on the product;
- shape, since it can be a standard cabinet or corner, as well as triangular, rectangular or asymmetrical;
- height, and it is advisable to choose this parameter in such a way that the process of cleaning and changing water in the aquarium is simple and does not require removing the product from the stand.
Once the drawing is completely ready, you can begin the actual process of creating such a bedside table.
Why do you need a special cabinet?
If the volume of the container is 50 liters or more, then a flimsy table will not be suitable for this; you will need a strong stand. In addition to a heavy aquarium, the walls of which have a thickness ranging from 8 to 10 mm, the tabletop will be affected by water, soil, decorative elements and technical devices. If there is a deflection of even one millimeter, a crack may appear in the bottom glass, which will subsequently cause trouble. Therefore, the issue of making a cabinet should be taken very seriously.
Preparing parts
How to make a cabinet for an aquarium? The procedure begins with the preparation of different parts of this structure, which will then be attached to each other. The process of creating parts itself is divided into stages:
- in accordance with the drawing, patterns are applied to the paper, which are then carefully cut out;
- they are firmly attached to sheets of plywood or other material chosen for this work;
- markings are applied to the material;
- All parts are cut out using a jigsaw or other tool;
- Stiffening ribs are prepared, which can be metal or wood, and their height must be optimal for use, so they often have to be trimmed or filed.
In the process of preparing parts, a previously made diagram is certainly used to make sure there are no errors and also to prevent distortions. To guarantee an ideal result, it is recommended to take into account some expert advice:
- holes will certainly be made in the back wall through which electrical cords and a hose will be connected to the aquarium, and such a solution guarantees a neat design in which there will be no ugly parts;
- stiffening ribs are certainly made, which are mounted along the entire length of the bedside table, and it is advisable to leave a distance between them of 40 cm, and their main purpose is to give the entire structure reliability, so even under significant loads it will not sag;
- a fairly large distance is left between the doors and the tabletop, since if the bedside table does not withstand serious pressure, a situation may arise when the top sags a little, so it will not be possible to even simply open the door to gain access to the internal contents of this piece of furniture;
- if you plan to install a really heavy aquarium, then it is advisable not to make legs for the stand and not to attach it to wheels, so it is installed on a hard and flat surface, on which a rubber or foam mat is laid in advance;
- A stand for an aquarium with your own hands is standardly equal in height from 60 to 70 cm.
To make the structure not only durable, but also attractive, it is recommended to sheathe it with natural solid wood, plastic panels or other decorative materials.
If you plan to use wooden panels, but preliminary gluing and sanding will be required
PVC edge
Homemade cabinet for an aquarium
The main purpose of aquarium stands is to constantly support the heavy weight of both the aquarium itself and all its components, which together can reach a mass of several hundred kilograms. Therefore, the design of the cabinets must have a sufficient margin of safety, as well as have a strong back wall, which is a load-bearing wall for the entire structure. Having purchased an aquarium, many are tempted to install it on cabinets they have already purchased. Not only are such products structurally not designed for constant high loads, if your aquarium is large, but also various problems may arise during operation. The fact is that over time, the material from which the fittings are made begins to sag under load. This can lead to the fact that existing doors may not open without first draining the water. This is the best case scenario. In the worst case, a sagging countertop can cause the aquarium to crack and break.
If you still decide to use such a cabinet, then it requires a radical change in the entire structure, which in the case of large aquariums is completely impractical. It will be more profitable to either buy or order a bedside table. Or make it on your own, just the way you need it for your water world. This is what the author of the YouTube channel Maxim Kozlov did.
The cabinet will be made of two sheets of 10 mm plywood, and the beams that the author had left over from previous projects will be used as load-bearing parts.
8 power parts are cut to which all other plywood parts of the cabinet will be attached. The author uses beams in order not to connect the plywood together joint to joint, and when gluing parts, the area covered with glue increases significantly. The project is drawn in the AUTOCAD program, so all the parts are filed and prepared immediately, checking against a ready-made drawing. The program helps you think through the optimal cutting of parts and reduce material consumption. The workpieces are carefully polished so that there are no protruding fibers during assembly.
The assembly of the cabinet begins with the creation of the upper and lower reinforcing straps. Since all parts have a clear geometry of corners, there is no need for measuring tools. To set an even angle of the assembly, the author uses one of the side posts, which is equal in size to the inter-shelf distance. To install the parts together, a pin hammer gun is used, which is effective even when joining thin plywood at the end. The micropin, when entering the material, unlike other fasteners used, a nail or a self-tapping screw, does not move apart or weaken the layers and is held inside very tightly. Having assembled the upper and lower frames while simultaneously attaching the shelves to them, the cabinet legs are attached and mounted to them. All other parts of the product are already targeted to the legs. In this way, two side parts of the cabinet are made. The finished product will be quite large, and the table on which it is assembled will no longer be enough. After transferring the finished parts to the floor and pressing the middle part of the cabinet with a clamp, the author assembles all the parts into one whole. The middle part will have one large compartment for storing a variety of aquarium accessories or replacement water containers. The side parts and the top shelf are attached. The back part is hemmed, also made of 10 mm plywood, which is the main stiffener. The next step is to secure the tabletop. It is also made of three parts, since the finished cabinet will be about 170 cm. And so that the tabletop does not look very thin against the background of thick walls, it was decided to give it massiveness using 15 mm. slats of plywood hemmed underneath. Usually they cover the end part of plywood products, but here the author decided not to do this; the product will still be painted. The cabinet is ready. Let's move on to finishing. We clean out all the irregularities and burrs that inevitably arise when assembling any product. Next we move on to painting. The cabinet will be in two colors - the outer part will be painted white, and the inner part will be painted dark. Painting was carried out using a roller, which, firstly, is very convenient, and secondly, it helps to evenly apply the paint to the finished product. Before painting, no primer is used, because... adhesion with plywood is already very good. Before moving on to painting the interior, the author seals the front part of the cabinet with masking tape so as not to stain the light coating. Wenge-colored primer oil was used to paint the interior compartment. After some time, the tape was removed and applied along the edges of the inside of the shelves. The front part is painted with white paint in several layers, since oil can still flow where it shouldn’t. After painting, the author, by sanding the edges of the shelves, gave them a worn effect. The result is such an interesting modern shelf on which you can safely place an aquarium - it won’t break! Good luck and inspiration to everyone! SourceBecome the author of the site, publish your own articles, descriptions of homemade products and pay for the text. Read more here.
Installation
The resulting bedside table, intended for an aquarium and having high strength and stability, must be installed correctly, for which it is important to determine the optimal location for it. Additionally, the area where this structure will be located must be prepared. To do this, follow these steps:
- the place is carefully prepared, for which it is important to make sure that it is perfectly level and resistant to high loads;
- the area is cleaned and leveled if necessary, since even minor transitions are not allowed;
- the selected area of the room should not be exposed to direct sunlight;
- the necessary equipment for the aquarium is purchased in advance, which includes a filter, compressor and heater;
- a rubber mat or other lining that can withstand significant impacts is laid on the prepared area;
- The product is being installed.
Thus, it is important not only to take care of creating a high-quality bedside table, but also to prepare a place for its installation.
Making a corner cabinet for a 150 or 200 l aquarium
To simplify the work of making a cabinet, you can purchase ready-made chipboard panels that have laminated edges. It is especially important before starting work to determine the additional components that will be placed inside the piece of furniture. This could be a water filter that is installed externally.
To work, you will need 4 panels with dimensions equal to 16 x 300 x 800 mm, two panels should have dimensions 16 x 268 x 284 mm, one panel will have dimensions 16 x 316 x 300 mm, another – 16 x 800 x 800 mm. For technical elements, electricity must be supplied to the installation site of the cabinet. At the first stage, side panels with dimensions of 16 x 300 x 800 mm are connected. This work must be done using 3.8 x 55 mm self-tapping screws. Sometimes confirmed screws are used, for which holes must first be prepared.
When you make a corner cabinet for an aquarium with your own hands, at the next stage you can connect the resulting structure with the top shelf; the same technology is used for this. The next step is to install the bottom, the fasteners remain the same. The doors are installed last, followed by the legs. The supporting corners should be strengthened on the sidewalls; they should be made from cuts from the table top. At the upper connection, self-tapping screws with dimensions of 3.8 x 55 mm should be used; as for the lower connection, the fastener dimensions are reduced to 3.8 x 42 mm. The fasteners should not be installed too low.
Door installation
Often bedside tables are created with drawers or compartments inside. To gain access to them, you should make high-quality and easy-to-use doors. The entire process of their installation is divided into stages:
- blanks for the doors are made, for which the optimal choice would be to purchase a joiner's panel, and the size of the doors should correspond to the dimensions of the resulting blank;
- for loops, markings are applied for the sockets;
- holes of the required size are made;
- the doors are fixed to the hinges on the side of the bedside table, for which it is advisable to use four hinges;
- Handles are attached to the doors to make them easy to open and close.
Doors can be made from other materials, and it is advisable to pay attention to their decoration so that the facade of the bedside table looks really attractive and interesting.
Side trim
Door installation
Assembling the cabinet
When making a stand for an aquarium with your own hands, it is better to enlist outside help, because some workpieces have to be connected simultaneously, working by weight. The first step is to prepare the tongues and grooves for the wall. They will be located in the bottom, sides and middle lid. Such elements will also be located in the blanks of the upper box.
Instead of a circular saw, a milling machine is sometimes used. At the next stage, you need to glue the parts of the back wall and the upper corner. The latter will be located behind the module for illumination. The planks are tightened together with clamps and left until dry. When making a cabinet for an aquarium with your own hands, at the next stage, 38-mm base bars should be screwed to the bottom shelf, which will serve as the bottom. It is on them that the entire structure will be installed.
18 mm plates should be screwed to the inner sides to install the middle cover. The leading edges should be flush with the edges of the bottom shelf. The rear ones will be located at the level of the inner edge of the groove. The middle lid and bottom should be glued to the central inner partition. According to the design features, the described chest of drawers must have a vertical partition for every 30 cm of the tabletop. If you reinforce in this way, you will be able to maintain the given geometry.
The lower part of the rear wall should be inserted into the bottom groove. One side side is fixed to the middle cover and bottom using dowels; they should be placed on glue, guiding the back wall into the groove of the side wall. A corner is attached to the upper part of the sidewall; this should be done in the same way, using glue and dowels. It is on the corner that the upper module will rest. All these manipulations must be repeated using the second side wall.
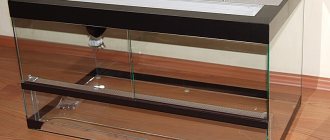
Tabletop
A special tabletop can be placed on top of the bedside table, which can withstand severe impacts and is easy to clean. It can be made from different materials:
- wooden will go well with the bedside table itself;
- glass provides an unsurpassed view of the entire structure;
- metal can withstand significant impacts;
- plastic can be presented in different colors and shapes, but it is important to make sure that special high-quality plastic was used for its production.
The tabletop may extend slightly beyond the resulting bedside table, which will add attractiveness and uniqueness to the design. Thus, making your own cabinet designed for installing an aquarium is quite simple. Photos of the finished results are located below, so it is possible to create a variety of designs that differ in dimensions, colors, internal contents and other parameters. During the production process, you can use different materials, and you do not need to use specific or complex tools. By doing it yourself, you won’t have to spend a lot of money to get a high-quality and reliable cabinet. This will result in a design that fits perfectly into the room and suits the tastes of the homeowners.
Tabletop installation
Decoration with decorative strip
Varnish coating