GD Star Rating loading…
Currently, many lovers of aquarium fish and other inhabitants of this environment are asking questions about the condition of their aquarium, its uniqueness, cleanliness and safety, beauty, etc. Therefore, I will tell you how to make such an irreplaceable thing in an aquarium as a grotto . Of course, many may argue that you can buy it in any specialized store, but what you created with your own hands gives you confidence in quality and safety for your pets. The grotto is a shelter for fish and a unique design for your aquarium. To get started, you need to select the source material to create a grotto. It is advisable to exclude anything of artificial origin (glue, sealants, paints, etc.). Here are some examples of creating a grotto:
What is a grotto and its types
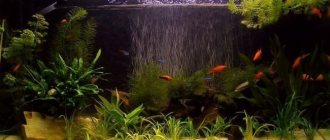
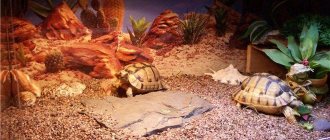
An aquarium grotto is a shelter for fish, which also serves as a decoration in which fish can hide eggs, and then it will become a home for growing fry and small fish. Other aquatic animals, such as shrimp or crayfish, desperately need shelter all their lives. You can make a grotto for an aquarium with your own hands or buy a ready-made one in a store.
The material chosen for them is natural - stone, wood, clay, although plastic decorations are increasingly appearing in stores. Figures such as a ship, a mountain, a chest, a castle and others with holes and holes are popular.
Clay grottoes
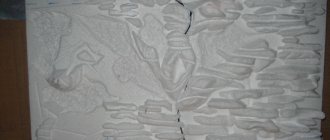
Making a grotto from clay is reminiscent of modeling with plasticine, only red clay is used instead of this material. Using this material, you can make a harmless structure for waterfowl according to your own flight of fancy.
The process of sculpting this design is quite long. After making the shape of the grotto, it will need to be thoroughly dried for 3-5 days in open sunlight, and if it is not possible to place the structure outside, then aquarists use a microwave oven.
This procedure is required. After thorough drying, the liquid present in the clay, which is responsible for the strength of the finished structure, evaporates.
Next, you will need to burn the structure well; this is done in a muffle printing workshop, or in a preheated oven at 220℃. This procedure is carried out over an hour, but the oven door should be kept ajar, and after finishing work on the grotto, you should gradually reduce the temperature over 20 minutes. If you do not attach importance to these actions, the finished structure may lose its strength and become fragile.
Today, these are not the only examples of making grottoes at home, and there are more and more of them every day. However, first of all, when making this design, you should take care of its effect on fish health and appearance.
Requirements
The material must not contain harmful impurities. For example, lime, inclusions of iron (nails, staples), chemical dyes, soluble elements, such as paper, fabric.
- If you select materials yourself, you must follow the preparation rules
- Fish are injured on sharp corners and surfaces, get stuck and die in narrow crevices.
- Wooden parts are cleaned and treated
- Varieties with oily wood, such as oak and pine, are not suitable.
Look what beauty you can make for your pets.
Necessary materials
If you have decided to make the decorations yourself, then first of all you need to pay attention to the materials. They must be safe and not change the aquatic environment, because many fish react very painfully not only to temperature, but also to the acidity, hardness and chemical composition of the water. Here are the basic rules:
- Materials containing lime should not be used. It increases the acidity of the water and makes it unsuitable for many fish. Cement should not be used for the same reason.
- Materials with a high iron content are also highly undesirable.
- Using stones from industrial areas or those picked up near businesses, busy highways and landfills is a very bad idea. They may contain traces of heavy substances that will not be removed even after boiling.
- There should be no sharp corners or edges, because the fish may get hurt. Even a small hole with sharp edges can cause harm if the fish does not calculate its strength and tries to squeeze through it.
- If the parts are made of wood, then you should find out in advance about the type of wood: some can release harmful substances into the water, for example, oak.
- Only special sealant for aquariums can be used as glue; the rest contain harmful substances that spoil the water.
Shopping is a joy
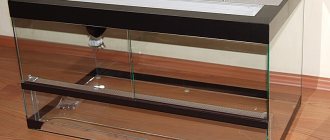
Today, pet stores and Internet sites offer a variety of artificial grottoes. The buyer will find them for any aquarium, ranging in size from 5 cm to a meter. A wide selection of shapes, colors and materials are available.
The decor in the aquarium is selected according to the designer’s idea or following an instant impulse. The first places come out to be ships and chests, usually associated with pirates and shipwrecks. I add mystery to the castles and towers, and the skulls have a slightly darker style. Not only fish can hide in these grottoes, but also compressors and filters can be disguised.
Options that are close to natural shelters: rocks, branches, corals, heaps of pebbles will help create the effect of a sea or river bottom. Especially if you plant algae correctly and decorate the glass bottom.
The leading position is occupied by grottoes made of ceramics, which are heavy enough to stand on the bottom, non-toxic and durable.
Separately, there is an artificial grotto made of plastic and plastic. Scientists have proven that they contain harmful additives that poison the water and cause illness in fish. Therefore, you should carefully read the composition and recommendations on the product description. Such decorations are often made for completely artificial aquariums, in which even the fish are plastic.
How to make a grotto for an aquarium with your own hands
When making a cozy shelter for aquarium fish, various natural and artificial materials can be used: stones, clay, wood, coconut, glass bottle.
Stones
From small stones that do not have sharp edges, you can make a frameless grotto. Initially, you need to boil the material, and then degrease it with acetone and sequentially glue the stones to each other, row by row, forming a small hemisphere with an open entrance.
To glue the materials together, it is recommended to use a plastic, colorless sealant. After gluing and drying, it is necessary to keep the product in replaceable water for 3 days. A grotto made of stones should be installed before filling the aquarium with water, since this requires gluing the first row of stones to the bottom glass of the tank.
Clay
A clay grotto is suitable for creating a beautiful aquarium design and a secluded home for fish. You can buy clay at a craft store. It is recommended to use white clay, because... it contains a minimum of unnecessary impurities. By adding water and stirring, you need to bring the composition to the consistency of plasticine and mold the resulting mass into a house of the desired shape.
After formation, the structure must be dried at room temperature for 6 days and fired in the oven. The firing time is 60 minutes; it is recommended to keep the oven door slightly open. The product must be heated gradually, from a minimum temperature of +200°C to a maximum of +300°C. The grotto also needs to be cooled slowly, reducing the firing temperature over half an hour. Only after the grotto has completely cooled can it be removed from the oven. Before loading into the aquarium, the fish house must be rinsed with water.
Tree
To make a wooden grotto, you need to take a massive piece of driftwood (so that it can be easily drowned) or a stump from a non-resinous tree. The bark should be removed and the outer surface sanded to prevent injury to the fish. Then you need to drill out the caves of the desired diameter and round the edges. To avoid damage to wood in water, it is recommended to burn the product with a blowtorch or gas burner.
To fix a wooden grotto, you need to tie it to a large stone or glue it to a glass surface using sealant.
Coconut
A coconut grotto is good and safe for fish. To make it, you need to purchase a fresh, ripe specimen. Initially, you need to open 3 holes located on the back side of the coconut palm fruit, and then drain the milky liquid. Then, using a hacksaw for metal, you need to saw off the back part and remove the pulp with a knife. Then the workpiece should be boiled several times for half an hour, washing it after each boiling. After this, using a stiff brush, you need to remove the remaining pulp and cut holes of the required size in the shell.
Before placing it in the aquarium, a homemade grotto should be soaked with changes of water until it stops coloring the liquid. After installing the decoration in the aquarium, it is recommended to pour soil into the shell (to make it heavier).
Glass bottle
A grotto made from a glass bottle is a good and budget option for decorating an aquarium. The volume of the container is selected depending on the size of the fish. First, the vessel must be washed well in hot water and the neck or bottom cut to the required size. For this purpose, you should soak a string in gasoline, wrap it tightly around the bottle in the right place and set it on fire. When the thread burns out, it is necessary to lower the vessel into a container with melt water. It will break off in the intended place. Finally, you need to sand the sharp edges with a fine file.
To improve the appearance of your homemade shelter, you can coat the surface of the bottle with aquarium glue and roll it in pebbles. Then you need to wait for the sealant to dry and, if desired, stick on decorative elements. Before placing it in the aquarium, the structure must be kept in replaceable water for 4 days.
If your hands grow from where they need to be
If you awaken your imagination and choose the right materials, you will be able to make a grotto with your own hands, which has a unique, memorable design. The simplest options:
- Several or one large cobblestone in which a hole is cut. Endure the clouds of dust and the mink is ready. If the stone is large, then a piece of special material is cut under it so that the glass does not crack. It is better to choose stones on the banks of rivers and lakes and under no circumstances in landfills, factory and industrial quarries, or roads. Before immersion, the stones are washed with running water and immersed in boiling water for 10 minutes. Within a month or two, the stones are covered with small algae. It is recommended to wash them in running water every time the water is changed.
- Driftwood becomes an excellent decoration, used by nature itself and well known to fish. The main thing is that the wood does not emit resin. It is recommended to collect branches on the banks of rivers, since they have already been soaked and dried by nature. An unusual type of snag found in the forest or garden is checked for the presence of dust, insects and fungus, then thoroughly washed. The dried branch is processed, cleaned and holes are cut out or burned out in it. For reliability, it is glued to the bottom or pressed down with a stone.
- Coconut. Half a freshly cut coconut is thoroughly cleaned, and in the case of a small aquarium, all hair on the outside is removed. Then it is boiled for about 5 minutes and attached to the bottom with special cement. Holes are cut out for the fish - entrances.
- Glass bottles, especially those of unusual shape, will save small fish and fry from aggressive neighbors. It is important to wash it thoroughly and secure it to the bottom with sand, small stones and glass beads.
- Pebbles. If you show your imagination and use special aquarium silicone, you can build a castle or grotto from stones, which will become a memorable detail in any aquarium.
- Clay. Nowadays you can buy modeling clay at any craft store. When making a clay aquarium grotto with your own hands, you can use almost any shape - coral, ship, the main thing is to burn it. If there are no harmful impurities in the clay, then it will become an ideal natural home for fish and crayfish.
Woody grotto
Such an aquarium interior item can be made by any aquascaper using available materials. For this, stump is used, peeled and sanded on the outside. These actions are mandatory so that the structure itself does not cause bodily harm to the fish. Next, you need to use a drill to drill a wide hole inside the stump, according to your own creative plan, and the decorating grotto is ready!
Also, many aquarists, in order to protect their pets, burn the stump with a torch or blowtorch, then the edges of the structure become smoother.
This option for making a grotto in the end result looks natural and organic. It can be glued to the bottom of the aquarium or attached to a base you made yourself and sprinkled with substrate.
Each fish has a hole
It is known that different species of fish have different preferences for the places in which they are ready to settle. And it’s better to decide on this before making a grotto with your own hands.
Catfish need a wooden niche or at least a large piece of driftwood to hide under. Breeders advise taking branches or roots of linden, grape vines, pears, and apple trees. The branches should be wide enough and form something like a pool so that the adults freeze in it, and then the offspring will grow there. Also, crawling towards the trunk, the catfish collects particles that improve its digestion.
Viviparous fish, such as swordtails, guppies and mollies, need wide houses with small entrances. The female will calmly give birth in them and the fry will sit in them. Even parents can show aggression towards newborns. Excellent options would be coconut halves, a ship with a wide and hollow deck, or a cave.
Labyrinth fish, for example, lalius, bettas and gouramis, during the period of preparation for offspring, very aggressively attack anyone who approaches their bubble home. To separate families and neighbors, more than one grotto is placed in such an aquarium, and the shapes and sizes should be as varied as possible
But goldfish, which grow to quite large sizes, simply love to spin around in numerous holes and buildings. Flat castles with wide and varied arches or arches glued together from small stones are perfect for them.
It is important that when placing a grotto made by yourself or bought in a store in an aquarium, it is important to maintain the proportions, not allowing it to occupy more than 30 percent of the volume.
Properly and creatively selected decorations will decorate the aquarium and the interior as a whole.
Video about creating a grotto for an aquarium
AdminAuthor of the article
Did you like the article?
Share with your friends:
Decorations made of pebbles
The easiest option is to make a grotto out of stones for your aquarium with your own hands. Flat river pebbles will do. You just need to glue the stones together in random order to make a small hemisphere. For convenience, you can put something underneath, for example, a toilet paper roll. It will act as a frame that will support the stones in the desired shape until the glue dries. This takes about a day.
The main difficulty here is that you need to glue the first layer of stones directly to the bottom of the aquarium, because the grotto must stand motionless under water, otherwise it will simply fall apart. If the stones are heavy enough, then you don’t have to do this. It should be taken into account that the bottom will still be covered with a layer of soil, so the entrance must either be located above the ground level, or be large enough for the fish to swim inside.
To be on the safe side, you can place the grotto in an aquarium without fish for several days, periodically changing the water. This will help flush out any remaining harmful substances from the materials and check the strength of the structure.
There is another way, but it requires the use of a drill. You will need a stone of a suitable size to drill a fish cave in it. The advantage of this option is that there is no need to glue it to the bottom; there is nothing there to fall apart even when moving. But there are also disadvantages - you need minimal skills in working with drills, a correctly selected stone (not only in size, but also in material, because not everyone can be drilled just like that) and a lot of patience. There will be a lot of noise and dust during operation.
Step-by-step instructions for making a grotto with your own hands
When the raw materials from which the fish shelter will be made are selected, you can proceed directly to production.
From stone
To make a shelter for fish from stone, you will need:
- stones or pebbles of the same size (river, sea);
- silicone-based adhesive-sealant intended for aquariums;
- tray for stones.
Further actions take place in the following sequence:
- The first layer of stone is laid out on the stand in such a way as to create a horseshoe shape.
- Glue is applied to the stone layer in such a volume that the parts are tightly attached to each other. In this case, do not allow the glue to leak.
- A cone-shaped container or roll is placed in the middle of the structure. This is necessary to form the outline for the entrance. Such packaging must remain in the product until the contours of the shelter appear.
- Lay out the next layer and cover with glue again. You need so many layers of these to make a comfortable house.
- To make a grotto roof, crumpled paper is placed in the middle of the structure and a layer of stones is laid on top. Once the glue has dried, the paper can be removed.
After the house is ready and the seams have dried, the shelter is placed in water for several days, which is changed every day.
This way you can get rid of harmful impurities from glue and stone. At the end, the grotto can be lowered into the aquarium.
You can make a shelter for fish from solid stone. In this case, all the passages are cut out. This work is painstaking and dusty. But such a grotto has its own advantage - it is beautiful, without glue and monolithic.
Video: DIY pebble grotto
Made of wood
To prepare a wooden shelter, you will need the stump of any tree (except oak and varieties with increased resin release). Of course, the raw materials should not be rotten or rotten.
To make a shelter from a stump, we perform the following steps:
- We make holes in the driftwood. It can be in any form and in any quantity. You can turn on your imagination and act.
- We burn the resulting channels (with a blowtorch, lighter, etc.). Otherwise the tree will rot.
- We process the edges of the shelter until smooth. This is necessary so that the fish are not injured in the future.
- We attach such a grotto to the bottom of the aquarium with fishing line or using special silicone.
From clay
We all made crafts from plasticine as children. Accordingly, making a grotto yourself from red (yellow, blue, black) clay will not be difficult. Moreover, the shelter can be made of any shape - as your imagination dictates. So, how to make a clay grotto:
- They mold the blank and dry it for 3-5 days in the open sun. Modern craftsmen use a microwave oven for drying. Drying the clay is necessary to remove excess moisture, otherwise the resulting product will quickly break.
- The future grotto is being burned. Since not everyone has a muffle furnace at hand, they use a simple oven. Firing is carried out at a temperature of +220 °C for 60 minutes. The oven door should be slightly open. When time passes, you cannot turn off the oven immediately - the temperature is lowered gradually over 15-20 minutes.
After the product has cooled, the grotto is ready for use.
From a glass bottle
You can make a shelter from a simple glass bottle - you will get an excellent aquarium lair. The bottle is selected according to the size of the aquatic inhabitants - 0.33 l or 0.5 l. Then proceed according to the following instructions:
- The bottle is carefully washed in hot water.
- Trim the bottle to the required volume. To do this, moisten a thick thread with flammable material (for example, gasoline), wrap it around the container in the selected place and set it on fire. When the thread has burned, the bottle is lowered into a container of ice water. It is in the area where the thread was attached that the bottle will break off.
- Using a small file, the edges of the scrap are rounded.
This shelter is complete, but additional decor will add originality to it. To do this, coat the outer sides of the bottle with silicone and sprinkle coarse river sand or rolled fine gravel evenly over them. After that, the product dries for about a day and is placed at the bottom of the reservoir.
Video: DIY glass bottle grotto
Care
After placing the shelter in the aquarium, it is necessary to care for it. It is recommended to clean the water house from waste once a month and remove dirt from the soil under the decorative structure with a siphon. To properly clean the grotto, it will be enough to immerse it in hot water for a while. Experts do not recommend using household chemicals to wash the structure, since there is a high risk of poisoning aquatic life with chemicals.