Why do you need a background?
Before discussing the advantages and disadvantages of homemade backgrounds, it is useful to know why a homemade background is needed in the first place. Moreover, it’s worth making a reservation right away: you need to take care of what kind of decor you will put on your aquarium in advance, before you start landscaping and populating the container.
The background has a number of positive qualities, thanks to which it can be called an integral element of the aquarium. In general, its background performs the following functions:
- Practical function. The background can also be used as a completely utilitarian detail. Especially if it is a voluminous background. If you stick such a background into an aquarium, you can mask wires and hoses from equipment and “fill” the container if you are lacking decorative elements.
- Decorative function. Not only the shape of the container, the exotic nature of the plants and the brightness of the fish affect the appearance of the aquarium - it also depends on your decision - what kind of background you decide to glue. Correctly selected decor will allow you to hide some shortcomings and, on the contrary, put emphasis on the advantages, make the color of rare and exotic fish brighter, and give your aquarium exclusivity.
Return to content
Color selection
When decorating an artificial pond, it is important not only how to correctly glue the background to the aquarium, but also how to choose the right color for the decoration. The color of the film should emphasize the beauty of aquatic inhabitants, so most often experienced aquarists choose the following tones:
- Black is the most popular color. A black background can favorably highlight the color of bright fish, focusing interest on the inhabitants, which is why this color is preferred by owners of outlandish phenotypes.
- Blue – shades of blue and blue are used to visually expand space and create the illusion of ocean depths.
- Beige - shades of yellow, cream and chocolate are suitable for lovers of naturalness and naturalness, as they allow you to recreate river spaces. Dark-colored fish look nice against beige tones.
- Green – a calming shade of fresh greenery enhances depth and highlights lush underwater flora.
- White - a light backlit background creates a shimmering effect, so fish of both dark and light colors look equally beautiful on it. The disadvantage of using white is that dirt is immediately visible.
- The image is the so-called photo wallpaper, which you can choose in the store, or print it yourself, choosing the design you like. This can be a three-dimensional image of the depths of the sea, mountains, forests, or simply a single-color self-adhesive film that is attached to the back of the tank.
Aqualife
"Pitfalls" in making an internal volumetric background.
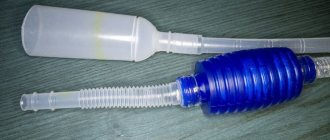
Hello to all those who have the idea of making a volumetric background with their own hands. To begin with, ask yourself whether you need it. After all, this will require time, some artistic skills, financial costs, and simply the presence of properly growing hands. Now add it all up and think whether it would be better to buy a ready-made background from the store. If after this you still have a strong desire to make it yourself, then my article will help you avoid some of the mistakes that arise in the process of making a background. First of all, decide what technology you will use to make the background. There aren't many of them, but there is a choice. I won’t describe each one in detail; there is a lot of such information on the Internet, and the purpose of the article is different. Here are examples of some technologies: 1. A relief is cut out on a foam base, which is then coated with several layers of cement mortar and, after drying, covered with paint; 2. Polyurethane foam is applied to the foam base, now from which a relief is cut out, then it is covered with several layers of cement mortar, after drying, the background is painted; 3. Polyurethane foam is applied to a flat plastic base, then, until it has dried, it is sprinkled with sand or gravel, decorated with roots, etc. After the foam has dried, it is covered with a fixative, for example two-component acrylic. 4. Polyurethane foam is applied to molded plastic to look like a stone relief, followed by processing and coating with paint based on dichloroethane glue. Perhaps on the internet you will find several more options for making an internal background. I want to say right away, read the authors’ articles more carefully and, if possible, ask them questions in order to better understand the technology. And don’t forget to study the statements of people who have already tried to do something on it; sometimes the authors themselves emphasize something new for themselves, precisely in these statements. How to choose a technology? Let me start with the fact that if a person is planning to do something himself rather than buy it, then most likely he will want to save money. Therefore, evaluate what materials you can get for less money and whether you can get them at all. Another important point is whether you are going to place the background in a new aquarium or an already running one. For example, a background made of foam base will have positive buoyancy and will need to be glued to the walls of the aquarium. You will have to drain all the water and put the inhabitants of the aquarium somewhere, and if this is not possible, you will have to look for a technology that produces a background with negative buoyancy. Some people suggest inserting it into the spacer between the bottom and the screed to avoid gluing, but this may not be suitable if the background consists of several pieces. Next, I think it’s important to pay attention to what type of water the background will be in. If in a cichlid, then a background made of cement is normal, but if in a herbalist, then backgrounds in which it is not used are better. Since if the protective layer is not of high quality (paint, acrylic, dichloroethane glue), pH fluctuations are possible, which will negatively affect the plants. By the way, the issue of painting the background is also relevant, because not every coloring method may be available. Below I will touch on it a little using my example. Well, now about how I made my background and what mistakes I made. I decided to make a malawi, the manufacturing technology I chose was this: I took a sheet of foam plastic (20 mm thick) and began to cut out the relief. Then I realized, this is the first mistake, the thickness is not sufficient to create a large relief. I corrected myself, started gluing pieces of foam plastic on top and processing them. It turned out more or less normal. Advice - before cutting out the relief, study pictures with stones, rocks, maybe even reefs. It will be easier for you to figure out what your background should look like. I didn't do this and had to edit it several times. And also, the more complex the terrain, the more difficult it will be to apply cement to it, I realized this later.
It's time to cover everything with cement. At first I tried it with just cement diluted with water, it applied well, but it turned out too thin. I added sand 2:1, the texture became more natural, and the layer turned out thicker. Although, it is better to apply cement without sand to clean foam plastic. I had to suffer, there were a lot of cracks between the foam stones, the brush couldn’t fit in there, so I just poured a more liquid solution in there. After each layer, I covered it with a wet rag and film on top and left it to dry overnight. So three layers.
When everything was dry, I decided to check how the background sinks. It turned out that there was no way, the weight of the cement crust was not enough. But I had to do without gluing, which means the background should sink. I planned to get some kind of balance so that I would sink and at the same time not weigh much in the water. It would have been possible to rip out all the foam, but I was afraid the background would become fragile. The thickness of the crust was only 5 mm. Moreover, the terrain was difficult, from which it was almost impossible to extract it. What helped here was that I glued the relief onto a foam sheet. It was decided to pick out only it, leaving only a small frame around the perimeter. It turned out pretty easy.
Next, to strengthen the background and at the same time obtain negative buoyancy, I poured a solution inside the frame. When it was dry, I repeated the experiment to check buoyancy. And what would you think... He did drown, but very well. Here’s another mistake of mine, I shouldn’t check right away at what weight the balance will be achieved. I had no intention of retreating. It was not realistic to remove part of the cement, so I decided to glue a sheet of foam plastic behind the background. Only now I checked in advance how much foam was needed. You may be laughing at my actions now, but this whole story may be useful for some to avoid my mistakes. Now all that's left to do is paint... I found several painting methods on the Internet, but I chose acrylic car enamels in spray cans. I started looking in stores for the colors I needed, but I couldn’t find what I wanted, so I picked out more or less suitable ones. Since the instructions for the can said to spray at a temperature not lower than +100C, I had to look for a suitable place. I assumed it would be outside, but at that time it was cold +50C, I had to drag it to work, where we have a spacious basement with good ventilation. Don't forget to take this into account when choosing a painting method. And good light is also important, ideally natural, you can use fluorescent lamps, in extreme cases incandescent (it hides the colors, giving them yellowness). When you cover with one color, everything is fine, but if you use many colors, it will be more difficult with poor light. So, having painted the background, I covered it on top with a layer of acrylic varnish, but I didn’t apply much.
After all, on the websites they said that you can only paint it and everything will be fine. The next step was soaking. Everything is simple here, I changed the water twice a day and so on for a week. True, in the end the paint came off in some places, but very little.
Finally it happened, the background is immersed in the water.
It seems like everything should be joy, but it wasn’t like that. Under aquarium lighting, the background color changed and not for the better, and the background itself seemed to have eaten up so much space (this is not noticeable in the photo). But that’s not all, with good aquarium lighting we were able to see that the paint had lifted in many places, which meant it would soon come off.
Why did you get up? It seems that I took the paint that was recommended and painted it according to the instructions, maybe I did not cover it with a little varnish? These are the thoughts that popped into my head. Having left the background in the water overnight, I woke up in the morning with the idea of redoing everything. It was decided to break off part of the background and then repaint everything. Breaking, not building, but you also need to be careful. I broke it off and it turned out the way I wanted. Since the paint didn’t work, I switched to another method. Oil paints with dichloroethane glue. The advantage was that the colors were whatever you wanted and the temperature didn’t affect it in any way. Eh, I should have studied the forums better. I painted it on the balcony, with the windows open only during the day, so that it could be clearly seen. True, I slightly changed the painting method that the author suggested; I added the paint directly to the glue and stirred it. The result was a tinted composition, which was then applied to the background. A little advice: apply lighter compounds first to the desired areas, and then cover with dark ones. It turns out more natural, once you try it you will understand. Finally ready. Just in case, I decided to soak it for a day, although the author said it was enough to rinse it in water several times.
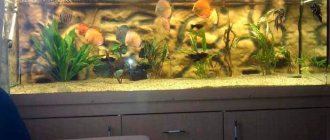
Well, here we go again, the background is in an aquarium. The colors have changed a little, but now for the better. I haven’t eaten so much anymore, of course, thanks to some tricks. I glued the film background not to the rear glass, but at a distance of 5 cm from it, and behind the inner background I placed a tubular sprayer, which creates a wall of bubbles, slightly hiding the rear glass. It feels like there is another 5-10 cm of aquarium behind the stones. I'm happy.
The background has been in the aqua for 5 days, I hope everything will be fine. Here are all my misadventures, maybe someone will find it useful. It's better to learn from the mistakes of others!
How to create a background with your own hands?
It is not difficult to make a background for an aquarium with your own hands, showing a little imagination and purchasing the necessary materials for the construction. Decorations for the back of the tank are divided into several types, each of which can be made by an aquarist at home.
Volumetric background
There are many methods for creating a relief background for an aquarium, but regardless of the method chosen, you should use only natural materials that will not harm the fish.
Method one
To make a three-dimensional foam background with your own hands, the fish holder will need:
- Acrylic paints.
- Styrofoam.
- Sharp knife.
- Silicone and tile adhesive.
- Brush.
Sequencing:
- The foam is broken into pieces so that the future decoration looks natural. The torn pieces are glued together so that the area of the pieces joined together is equal to the dimensions of the rear wall of the tank.
- The sides of the resulting structure are cleaned with a sharp knife, and the shape of the future decorative background is chosen based on personal preferences.
- The parts of the foam connected to each other are covered with tile adhesive, using 2-3 layers. After the glue has dried, the structure is painted with paints of pre-selected colors. It is advisable to choose soft shades: black, gray, dark blue.
- After waiting for the paint layer to dry, the decoration is placed in a container with clean water for two days to remove harmful impurities.
- The homemade background is fixed inside the tank using silicone glue.
Method two
To decorate an aquarium with a background made using the second method, you will need:
- Mounting foam.
- Polyethylene.
- Epoxy resin.
- Putty knife.
- Small pebbles.
- Acrylic paints.
How to make a background in an aquarium with your own hands:
- Polyethylene is covered with polyurethane foam, leveling the layer with a spatula.
- To give the background mass, pebbles are laid on the layer, and the structure is set aside to allow the layer to dry.
- When the first layer of foam has dried, a second layer of foam is applied to it, using intermittent movements with your hands to make the surface lumpy. You can decorate your future decoration with flat, beautiful stones.
- After waiting for the foam layer to dry, resin, previously diluted with paint, is applied to the surface.
- The finished decoration should be attached to the wall of the tank.
Method three
This is the most convenient and fastest method of how to decorate the back of an artificial pond. The aquarist will need:
- Cork bark.
- Fishing line.
- Live vegetation for the pond.
- Silicone glue.
Sequencing:
- The tree bark is thoroughly cleaned of dirt and washed under running water.
- The prepared bark is cut to the required size and glued to the wall.
- Using fishing line, live underwater flowers are fixed.
Method four
A simple and natural decoration for a pond with fish can be built using glue and stones. How to do:
- Medium-sized stones are cut into two parts so that one of the sides becomes even.
- The surface of each sample is coated with sealant and glued to the glass of the tank. Lay out the pebbles end to end, starting from the bottom.
- Leave the wall decorated with stones to dry, then fill it with water for 2 days.
- After two days, the liquid is drained and the procedure is repeated again.
Glass painting
Painting glass with oil paints is an affordable and easy way that any tank owner can handle. For painting, it is preferable to use one color - blue, black or green, evenly distributing the paint on the surface of the glass.
In addition to plain coloring, you can paint a picture on the wall if the owner is interested in drawing, or invite a familiar artist. The disadvantages of such decoration are:
- Inability to change the drawing.
- If stained incorrectly, gaps form on the surface.
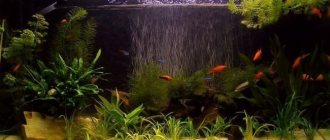
Natural flowers
Decorating the back of an artificial pond with live plants is an effective way to decorate the tank. It is important to note that this method is considered difficult to implement, but it helps to create decorations from natural and safe materials.
To work you will need:
- Metal mesh.
- Rubber suction cups.
- Fishing line.
- Plants, algae, mosses.
How to make:
- A piece twice as large as the back wall of the tank is cut out of the mesh.
- Using fishing line, plants are attached to half of the mesh in a dense layer so that there are no gaps.
- The net is folded in half and the ends are secured with fishing line.
- Suction cups are installed on the glass of the reservoir and the created living decoration is secured.
It is important to say how to properly fix the structure: there should be no empty spaces between the wall and the mesh, otherwise fish will get in there and not get out. As the plants grow, prune them regularly.
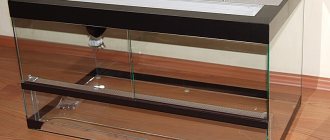
Film
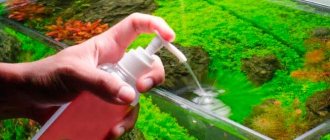
Film for tanks comes in two types: self-adhesive and regular. In the first case, you should measure the required amount of material according to the dimensions of the tank and cut it off. Then the film should be glued correctly - it is important to straighten the film using a card or ruler to avoid bubbles.
When using the second type, you will need glue or tape. Before you glue the background to the aquarium, you should learn about common mistakes that beginners make:
- When using tape, you cannot fix only the edges. Otherwise, air or water will get under the film, and the film will swell with bubbles.
- Vaseline, soap solutions and other similar products should not be used for gluing, otherwise the background will fall off.
- If the film background is attached from the inside, then a sealant is used for coupling.
How to stick a background on an aquarium correctly:
- The surface of the glass is cleaned and wiped dry with a clean towel.
- Glue is applied to the glass and spread in an even layer.
- A background is applied to the prepared glass and carefully straightened to expel excess air.
- For reliability, the film is fixed with tape.
A decorative background for an artificial reservoir is an opportunity to attractively design the tank and hide weak points. For every aquarist, creating decorations is a creative work that will help reveal hidden talents and create an original design.
Options for interior design
Backdrops for decorating the far wall can also have internal modifications. In this case, the background should be glued to the aquarium before it is filled with liquid and the fish settle in. There are many options for this design. You can add the seabed to the background using:
- PVC plates;
- stones;
- polyurethane foam;
- epoxy resin;
- cork bark;
- polystyrene foam;
- foam concrete and other materials.
How to make a background this way? It’s quite simple, if you use your imagination and basic ability to cut out relief on surfaces with a cork structure and correctly glue the most functional places. Original backgrounds are obtained for aquariums of square and rectangular shape, as well as with a curved front wall.
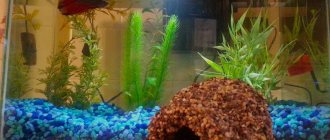
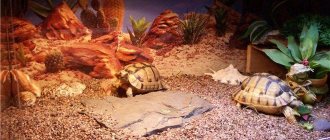
Foam background
Looks good attached to the bottom and partially to the back wall. In its production, not only cutting methods are used, but also gluing individual components, imitating, for example, shells, stones, remains of ships sunk in the sea, onto a special aquarium glue. In this case, the 3D effect will be real.
From cork bark
Making a landscape from cork bark for the background is a similar design option. However, before gluing the background of the aquarium, the cork layer around the perimeter should be trimmed, excluding rough surface irregularities. The water background will even out minor visual defects, but, for example, a neon shade of the backlight can highlight them unfavorably.
What is a background and what is it for?
The background is the most important element of aquadesign. Its main role is to hide everything unnecessary from view: the wall, wires, equipment and create an overall holistic impression of the design.
It itself remains unnoticeable, but allows you to diversify the compositions inside your home pond without interfering with your imagination or eating up valuable space.
The pinnacle of mastery is when the background and all other decorations create a spatial perspective, a single composition, and smoothly flow into each other.